by Cathy Dutertre
We can all agree that a very challenging year has created a rogue wave of serious problems for the art world. Museums and galleries worldwide have closed down, perhaps permanently for some, and planned exhibits have been extended by a year or more or simply cancelled.
Art is not only resilient to any socio-economic upheaval or a pandemic nightmare; it thrives in terrible times as the proverbial canary in the coal mine of cultures and societies.
Yet, galleries and museums have responded to these conditions by still creating physical exhibits throughout most of the year, albeit with visitor restrictions or virtual openings and artist talks. However, many artists we communicate with throughout the year were reluctant to participate or invest in producing new exhibit ready works for these museum and gallery venues. The reasoning given by many for such reluctance can be understood as perhaps a reaction based on fear, uncertainty and anxiety in a very difficult period.
The argument that few people will see a physical exhibit or that sales of artwork will simply not happen maybe partially true but fundamentally flawed.
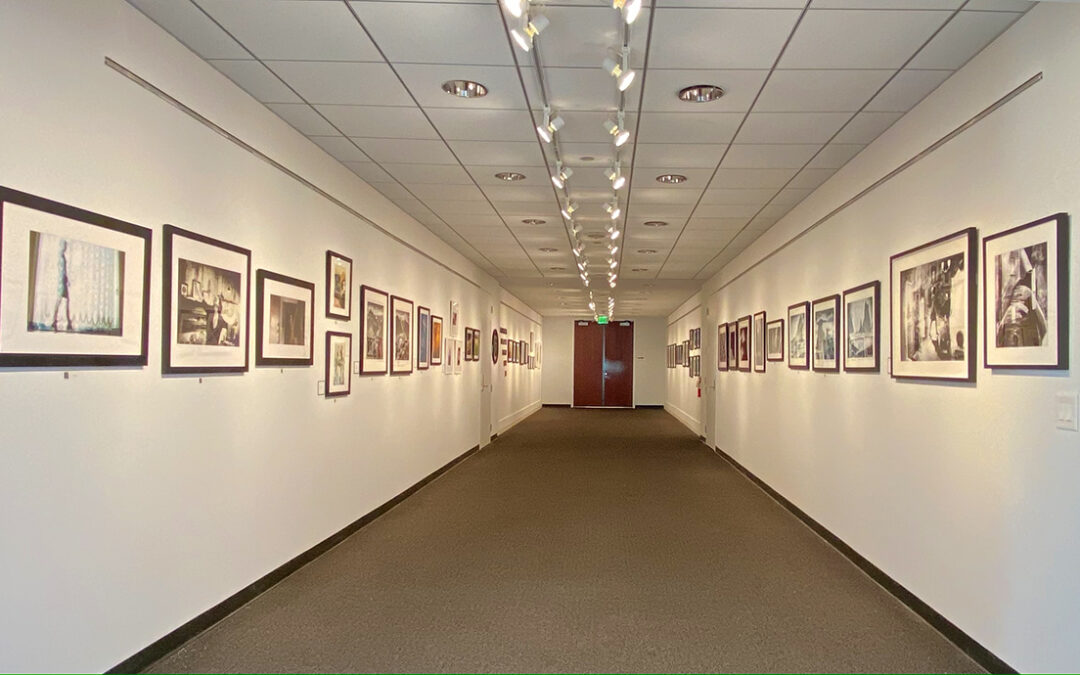
The physical public exhibit is the crucial final step in completing a body of work. Without that final act the work is not fully completed or even validated to some extent.
Art is meant to be seen, it is created to communicate, expose, educate, offer solutions and more often than not, art can and does change the world. It does not live on a computer screen or worse still, on a cellphone. Social media is not your audience. Instagram is not a benchmark for your art, that solely resides with the audience who connects physically and emotionally with your artwork.
Fewer visitors to galleries and museum is not a downfall; instead this is a much more engaged group of individuals who have made a commitment to participate in art and believe that art is important to them, especially now. Online sales of art have been touted by many commercial avenues as the opportunity of the century, and that may be true for a few artists, but overall these claims are dubious and often simply hogwash, poppycock as the English would say.
Artwork must be seen in person in order to achieve any validation, feedback or closure. The resilience of art is dependent on the artist’s commitment to exhibit their work, physically; for their sake and that of the museums and galleries who have supported them, and still do.
Pierre and Cathy Dutertre
by Pierre Dutertre
These are loaded questions, and my own opinion a lame request, one that should be answered within the context of culture and society.
From the earliest civilizations, art has been the voice of any culture, politically, religiously and within their geographical influences. The Roman Catholic Church, or the aspirations of the powerful ruling families of the time mostly drove the Italian Renaissance. It is a similar precept in the Age of Enlightenment in Europe, the advent of the modern industrial world, the world wars that took the lives of substantial generations.
So, let’s agree that art is a reflection of cultures, societies and times, as well as our individual responses to such. Was Nazi propaganda any different? It was after all art supporting a particular political system, wrongly as history would clearly tell us in hindsight.
Our individual responses as artists fit into two scenarios, the first supporting an individual society, politics and culture of a particular place and time, and the second as a voice of reason when such times become negative or nefarious as we see it, as individuals and culture. Artists are the reasonable voice that can expose, reveal and provoke reflections within a wider audience, often with a quiet voice that surpasses street demonstrations and other popular uprisings.
As artists, if we choose that complex and often understood path, we have the immense responsibility to do these hard things, beyond our individual choices and use our voices to express what we see, understand, accept and feel, positive or negative about where and when we live and what we comprehend about our own societies and cultures.
The very moment that you create visual art, photography, or even through many other forms, you express your opinion even if you are not fully aware of that declaration. A wonderful landscape will lead to an environmental position of some aspect; a street image will surely become a social statement; a derelict urban landscape as position on out of control economics; a politically or faith charged images will surely leads to the same. You, as an artist cannot escape the fact that you are expressing your views through your images. Instead of skirting the issue, you should embrace it and make your position clear, again in your own quiet voice. It is what you do, and should do.
We can then perhaps agree that all forms of art are indeed political by nature, all derived from our own culture, experiences and where and how we live. We should also be cognoscente that art is the ultimate canary in the mine, the voice that warns of excesses, impeding doom, and extremism in all forms.
by Pierre Dutertre
Definitely, around the off likelihood that you will be hunting for an astounding superior close to instruction you would do on your own or your kids an injuries in the event that you do not seem in the junior college or university solutions with your standard vicinity prior to dove in and leaping to the faculty technique for lifetime. One can find that junior schools routinely supply an equivalent amount of instruction for the simple courses that number one and next year undergrads regularly acquire, they’re a vastly improved esteem with the funds, and they are an extraordinary traits for your individuals who are trying to juggle their instruction with family and show results responsibilities.

by Pierre Dutertre

1: You need a clear direction. Before you embark on taking photographs randomly, waiting on the chance factor, one needs a clear plan of action when it comes to subject matter. Unless you are a photojournalist or street portraitist, visual opportunities will not come to you; instead you must seek a particular subject matter and plan for capturing precise images.
2: Do not look at your images on the camera’s display. The display on your camera is lying to you and in addition you are creating a false mental image of what the images should look like according to your visual experience, one far removed from what the camera captures. Use the camera display to only show you the histogram, in other words to display the technical exposure for your images, only.
3: Wait to preview your images. Just like a fine wine images have to be viewed several days after you create them. Initially, you are biased by the knowledge of where, when and how you took these images; this mental bias will inhibit you from examining the images in an impartial and free manner, often dismissing the deep and potentially important aspects of a particular photograph.
4: Take fewer images. The prevailing thinking in photography resides in taking more images and getting better by doing so. WRONG; by applying yourself in the viewfinder and carefully thinking about what and how you are capturing a photograph you will follow the intellectual and emotional aspects of what the medium is all about, namely conveying a statement to your viewer, emotional or aesthetic.
5: Less technology, more thinking. Think about the cost of every image, around $1.00 per capture considering the costs of DSLR’s lenses, software and computers, all with a limited lifespan. The digital photo world is wonderful, but no less expensive than the analog realm. You do not need to take every piece of equipment you own on very photo excursion, just the right items according to your pre-planning. Go lighter, your body will thank you.
by Pierre Dutertre
5 Tips for a Successful Portfolio
Written by Pierre Dutertre
1: Your portfolio is the sum total of your photographic experience, technical and artistic skills as well as your individual style, the way you see the world. Without a portfolio you can only say that you are a photographer, but cannot substantiate that statement.
2: Creating a portfolio together with a body or bodies of uniform work can be challenging, as it becomes too easy to become distracted or confused with the unity of your imagery, in terms of genres, styles or expected outcomes with the viewer.
3: The sequencing of images within your portfolio is an essential component to its expected presentation; too often, this sequencing is based upon personal preferences or artificial and rigid categorizations. In other words, a photographer assembling his or her own portfolio can easily become biased due to their intimate and usually confusing knowledge of each image, their circumstances and memories associated with these that are irrelevant to the viewer.
4: Your portfolio is only as strong as your weakest image. The sequencing of images for a portfolio can be achieved by printing small thumbnails of your images, cutting them and then physically assembling galleries that are unified stylistically, by genres, colors, compositions and communicative expressions. Some of the weaker images will often be left out at the end, thereby eliminating less valid or repetitive photographs.
5: It is essential to refine your portfolio. Having an industry professional, curator or consultant review your portfolio on a regular basis will help you refine the sequencing of the images, establish weak or strong categories of work, eliminate unnecessary photographs, as well as establish future directions and potential projects. The reviewer must be completely impartial, extensively experienced in such reviews and able to apply the formal critique principles used in the evaluation of the visual arts, whether commercial or fine art based.
by Pierre Dutertre
Many thanks to UPA Gallery – and Pierre Dutertre in particular – for inviting back me to write this follow-up blog on neutral density filters. I’m grateful for the opportunity to share my image capture workflow with readers of this educational blog series.
Neutral Density Filters and Zoom Lenses
In my last UPA blog post ( http://www.upagallery.com/blog/2014/7/2/the-use-of-natural-low-light-and-neutral-density-filters ) I reviewed how I use neutral density (ND) filters with prime lenses to create water-blur effects in my concept-based, Florida landscape series. In this post I’ll review my “Dark Mountains” project and how I use ND filters with zoom lenses to achieve cloud-blur effects.
Let me begin by first emphasizing that I prefer using prime lenses for landscape photography. Their sharp clarity, reduced barrel distortion (compared to a zoom lens) and ease of use with ND filters make them ideal for when I can get up close to my subject. But this isn’t always possible – or even advisable – in some cases. Another “issue” with prime lenses: when I’m traveling overseas, the last thing I want to do is haul around a bag full of different lenses! So, as a practical matter, a good zoom lens with a decent focal range (including wide angle) offers versatility for a variety of settings. The main zoom lens I carry is a Nikkor 28-300/1:3.5-5.6 VR. It’s a great lens with a great focal range – especially for travel photography! However, using ND filters with a zoom lens can be a little trickier than with a prime lens. I’ll review this in more detail shortly.
First, a quick review: what’s an ND filter? Basically, an ND filter is a lens made of dark glass (like sunglasses) that reduces the amount of light reaching a camera’s sensor. This allows for much slower shutter speeds in order to create motion-blur effects. There are different kinds of ND filters – slot-in, screw-in and variable – each with different density ratings that give various f-stop reductions. There are pros and cons to using each type that’s beyond the scope of this blog post, but a quick Google search using the terms “ND Filter” will pull up many useful articles for further reading.
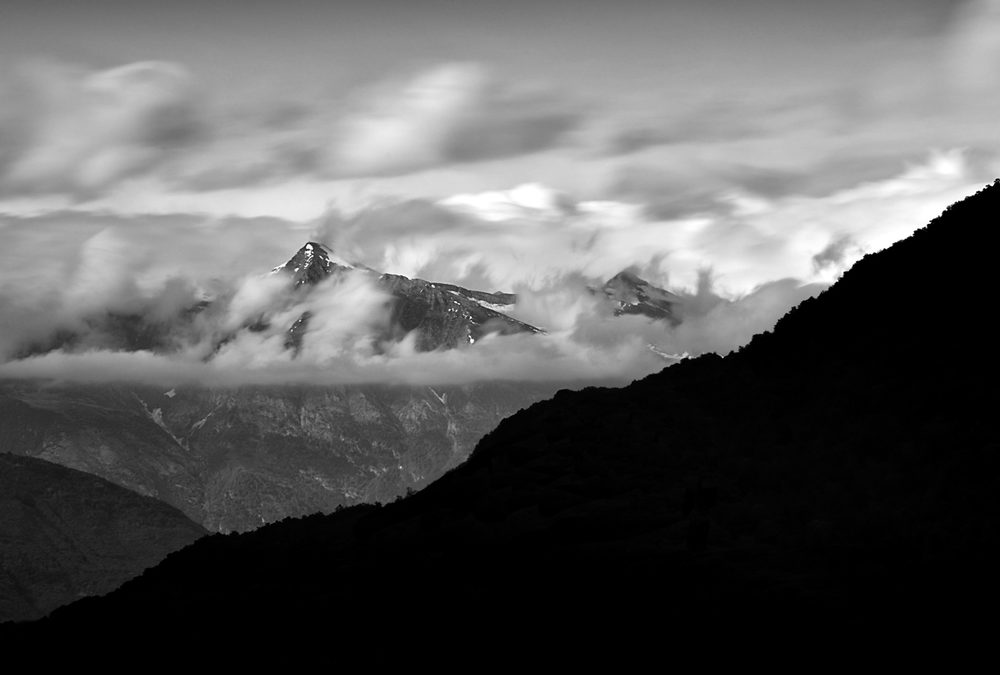
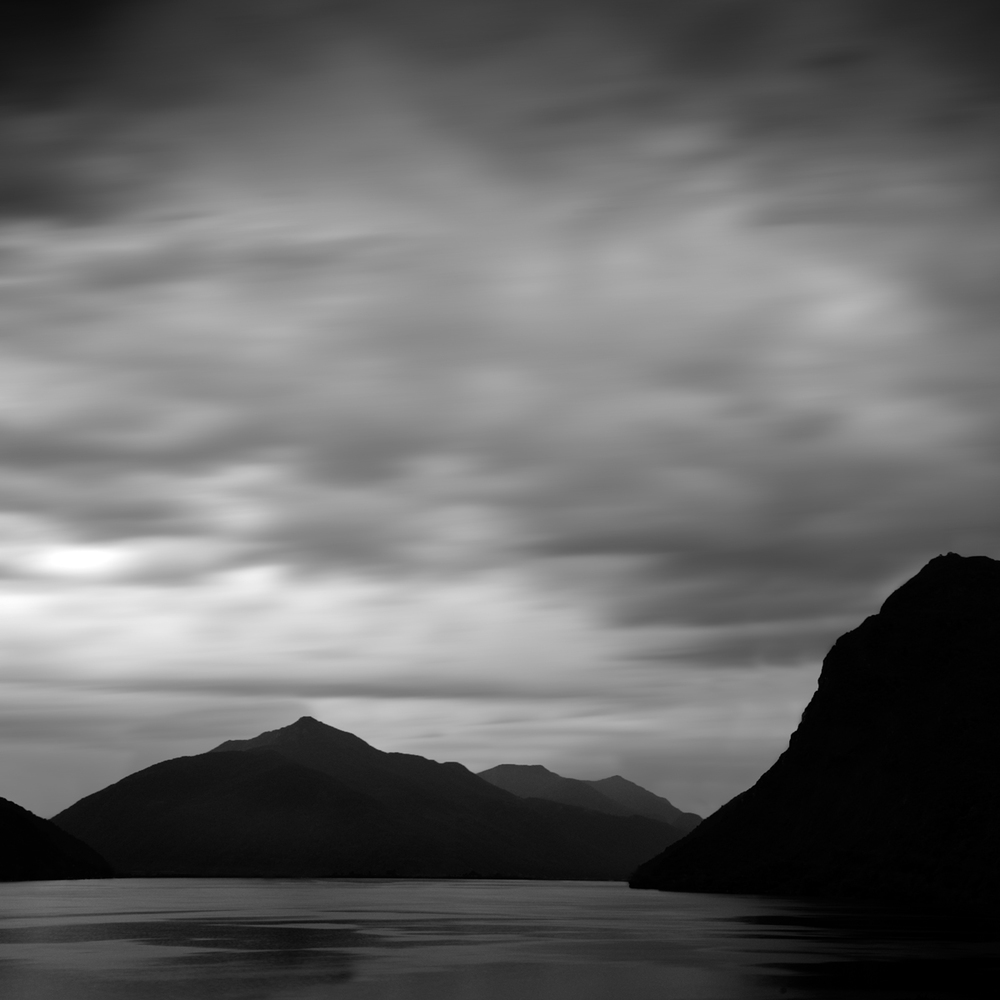 “Dark Mountains 1” by Scott Bolendz
“Dark Mountains” is a project that began in the rugged and majestic Italian lakes region. The looming proximity of so many ancient mountains so close to the populated lakes offered a blunt perspective on the human footprint: how inconsequential we seem compared to these hulking, geologic shapes. Although these mountains have been the familiar backdrop for thousands of years of local human history, their age, jagged mass and atmospheric volatility also gave them an air of danger and mystery. Here, one is made freshly aware of just how small, transient and vulnerable creatures we are in a much bigger, timeless physical universe. These images invite the viewer to reflect upon the enduring, elemental, often intimidating beauty of this alpine landscape. Unlike the warm, welcoming, spiritualized portrayal of mountains by Ansel Adams and others, these mountains are cold, shadowy and darkly sublime.
My reaction to this visually dramatic environment was a mixture of awe, humility and fear which is manifested in the moody atmosphere of the images in “Dark Mountains.” The aesthetics of this series are driven by three key elements that, when put together, convey a personal, emotion-driven understanding of this unique topography. These three elements are:
1. A sense of time passing by (conveyed by the moving, sometimes turbulent clouds).
2. A sense of timelessness (conveyed by the enduring geologic shapes).
3. A sense of the intimidating “otherness” of the alpine environment (conveyed, in part, by the extensive use of dark tones and large areas of pure black – a Bill Brandt influence).
The human presence is intentionally obscured in order to emphasize the elemental physical beauty of this landscape in a contemplative, rather than idealized, way without any distracting details.
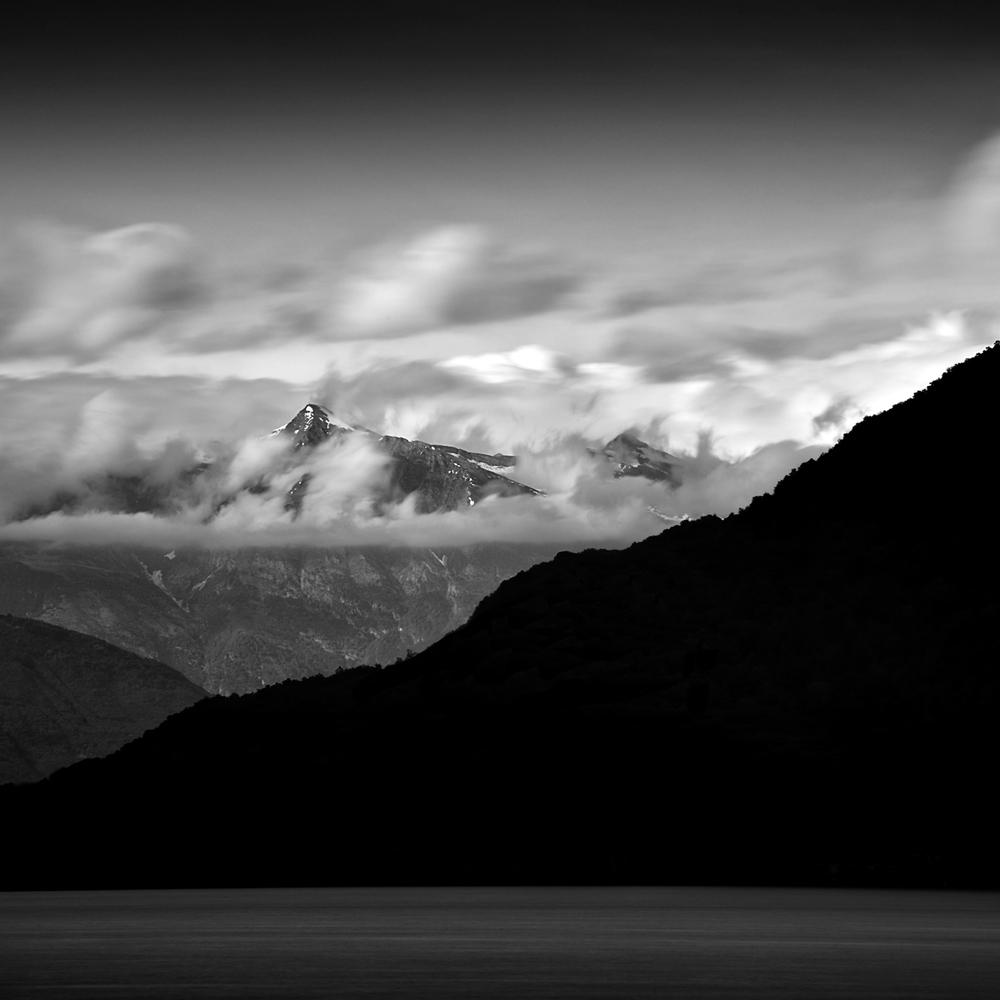 “Dark Mountains 4” by Scott Bolendz
The image “Dark Mountains 4” was shot in Connobio, Italy on the shores of Lake Maggiori just after sunset. On this particular evening, the clouds looked promising with their slow, dramatic swirl around the peaks of the Swiss alps in the distance. I wanted to capture the atmospheric turbulence, so the exposure needed to be long enough to somewhat maintain the cloud shapes AND convey a sense of motion – but not too long to transform the sky into a smooth, serene surface blur (i.e. Michael Kenna).
When using ND filters, it’s necessary to compose and meter the scene prior to attaching the filter (the viewfinder is too dark when the ND filter is attached). Here is the workflow I used for this particular image:
1. Set the camera (a Nikon D600) on a tripod.
2. Use Aperture Priority (AP) Mode and Auto-Focus (AF) to compose and focus the scene.
3. I set the AP to f/18, with a focal length of 100mm and ISO 100 for a reasonably good depth of field and long enough exposure anticipating the use of a 1000x ND filter (for a 10-stop reduction).
4. Now check the shutter speed. It was 1/50 for this particular camera setting.
5. Enter the 1/50 shutter speed value into a long exposure calculator (free apps are available on iTunes!) to see what new shutter speed would be required for a similar exposure if a 1000x ND filter were attached. In this case the calculated shutter speed would have to be 25 seconds, which seemed about right for the kind of cloud-blur effect I was after.
6. Next, put the camera setting on full manual and replicate all the previous settings from the AP mode (f/18, ISO 100, etc…) and select a new shutter speed of 25 seconds (to account for the 1000x ND filter).
7. Change Auto-Focus to Manual Focus.
8. Gently attach the 1000x ND filter to the zoom lens AND be extremely careful not to alter the focal length! This is crucial: if the focal length changes even a few millimeters the original focus will be lost and you’ll have to begin the process all over again.
9. Use a wireless shutter release or the camera’s timer to take the picture.
I often have to increase or decrease the calculated shutter speed based on what the first captured image actually looks like on the camera’s LCD screen. The image may be under or over-exposed (I only shoot RAW files so I can tweak the exposure in post-production). If you decide to re-compose the image, remove the ND filter and start the process all over again.
Here are two additional long-exposure images taken along Lake Maggiori with a zoom lens/1000x ND filter combination:
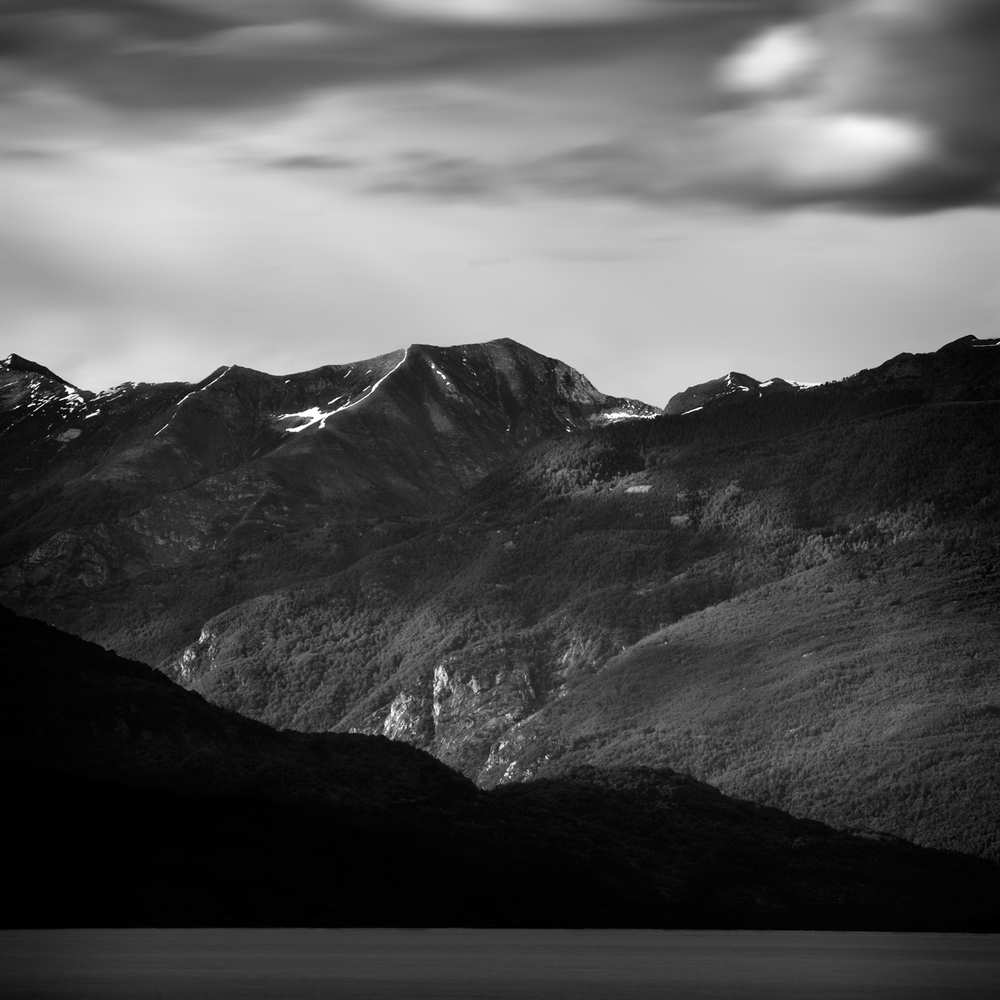 “Dark Mountains 8” by Scott Bolendz
 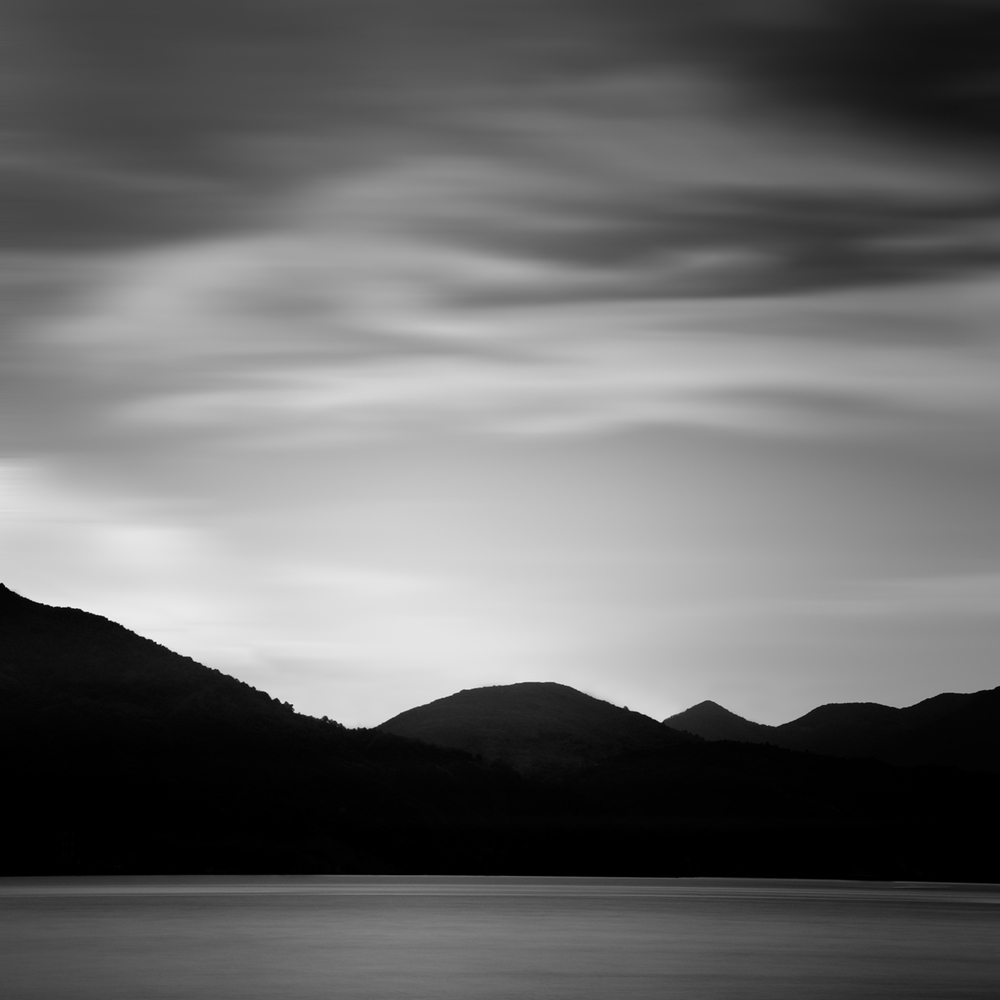 “Dark Mountains 12” by Scott Bolendz
Final Thoughts
ND filters can be quite challenging and frustrating to use at first, but with enough time, patience and practice they get easier to use and their range of possible aesthetic effects increases exponentially. They’re a powerful tool among many photographic tools that I use to help me produce intellectually-driven, concept-based visual art that conveys my personal understanding of the physical world in which we live. I invite you to see more of my landscape portfolios at www.scottbolendz.com and my Facebook page “Scott Bolendz Photography.”
By Scott Bolendz
Scott Bolendz is an emerging fine art photographer. His landscape images have won several awards at The Florida Museum of Photographic Arts in Tampa
by Pierre Dutertre
“You know, we don’t need a lot more anthropologists in the state. It’s a great degree if people want to get it, but we don’t need them here. I want to spend our dollars giving people science, technology, engineering, math degrees. That’s what our kids need to focus all their time and attention on. Those type of degrees. So when they get out of school, they can get a job.” Governor Rick Scott.
If this statement resonates as short sighted and full of drab political rhetoric, you would be right. Governor Scott is not alone in this thinking, Patrick McCrory of North Carolina was quick to state: “McCrory told radio host Bill Bennett, who was education secretary under President Reagan. “It’s not based on butts in seats but on how many of those butts can get jobs.”
These broad statements are echoed by many other Governors, education leaders and administrators.
“The Republican governor also called into question the value of publicly supporting liberal arts majors after the host made a joke about gender studies courses at UNC-Chapel Hill. “If you want to take gender studies that’s fine, go to a private school and take it,” McCrory told the radio host. “But I don’t want to subsidize that if that’s not going to get someone a job.” Governor McCrory.
From these politically induced statements derived from a modern socio-economic stance or perhaps an elitist attitude, the general public would be inclined to think of liberal arts education as a waste of public resources, personal time or worse, the rejection of American principles (get a job, pay your taxes and do not rock the establishment). In effect, the general attitude of America when it comes to education is one of cause and effect: a rapid training in a specific technology or service-orientated fields (such as the healthcare commerce, IT or other technical support matters) will simply result in more jobs, and therefore revenue all around. Everyone goes home happy, productive and relatively ignorant of the greater knowledge needed to personally advance in any particular career field.
But, what does liberal arts education bring to an individual or society as a whole?
The ability to do in-depth quality research, the skills to present such research and conclusions in a lucid and supported manner, presentation skills whether in speech or written, a desire to explore topics in anew and innovative fashion to support the advancement of a particular field. And yes, these are the traits needed to progress into any career, regardless of the field, and even more crucial; these are the prerequisites for innovation and entrepreneurship. A monkey-see, monkey-do educational approach may be useful to many who seek a new path in a difficult and rapidly evolving world economy, but may only result in the demise of an innovative society. There are indeed many other countries that can perform these basic technological tasks at a much-reduced cost, hence the global dissemination of jobs outside of the USA, leaving us a poorer world power, intellectually, innately and financially.
When it comes to education in the medium of photography, we are faced with three choices: private (for-profit) education, publically funded colleges and universities and the wide world of self-education through workshops and the Internet.
Certainly, private education has the advantage of being in a faster reactive mode when it comes to industry trends (DLSR video is a prime example), yet we must all be aware that the costs of private education can be exorbitant. With declining enrollments and the difficulties of placing students in full time employment in a field that often leads to a freelance status, private education is unlikely to continue with most forms of art curriculum.
Publicly funded institutions on the other hand are slow to react to changing market conditions and rapid advancements in technology, often taking years to implement new syllabi and relevant course content. With a top-heavy administration and ever diminishing funding, colleges and universities struggle to maintain their liberal arts programs whilst many faculty members are on the threshold of retirement. Art education does not always lead to full time employment as it is a career and life choice, one difficult to quantify in terms of the hard numbers so desired by the educational and political powers. And so the decline continues, replaced by a reactive position instead of a vision for the future.
Workshops and internet based specific training in the medium are abundant these days, yet most of these offerings are often very basic and rarely quantifiable in terms of the knowledge being fully acquired. The demographics are also very different than those of students enrolled in formal education, with the majority of attendees residing in a more mature status, often professionals or retirees who just want to improve their skills for a hobby scenario.
So, if you are fortunate to have received a liberal arts education, particularly in photography, you should appreciate that opportunity, one that may not be around much more in the future. The debate about education has been ongoing for many years, but so far words are the only actable points that have been produced. I expect that in Florida, within a few short years, there will remain only a few institutions with a photography program, a sad state of affairs in my humble opinion.
Pierre Dutertre is an educator on many levels, including teaching at a variety of institutions, a consultant to fine art as well as commercial photographers and a high-end workshop instructor at locations in central Florida

by Pierre Dutertre
In the first part we explored the foundational keywords associated with formulating a concept, The What and The Why.
In this section we will focus our attention on The How and The Who, namely how is the medium of photography specifically used to create images that support the overall concept, and finally who is the audience for your work and what type of presentation is needed to completely resolve your concept.
The HOW is a crucial process in the full realization of a concept, choosing the right tools and methodology in order to create photographs that are completely substantiated by a specific process. Rather than using whatever tool you have at hand, as a convenience approach, one must be able to decide what aspect and limitations of the medium are most appropriate to your conceptual involvement. In other words, perhaps a film based camera system may yield the results sought, over a perfect and sleek 35mm DSLR, or an alternative process such as Cyanotypes, Van Dyke Browns, platinum prints, the wet collodion process and so on could enhance the aesthetics and linguistic message embedded in your concept approach. A good example of such a radical approach can be seen in the wet collodion images of Sally Mann, with their eerie and mournful exploration of the past culture of the Deep South. The optical and physical flaws of the process are embraced by Mann to imbue a sense of time deconstruction and nostalgia.
 Sally Mann, In The Deep South, 1996, wet collodion process
Keith Carter is another established artist who uses a rare system made for architectural photographers years ago by Hasselblad with the ability to swing, shift and tilt the front lens in order to correct extreme perspectives. However, Carter uses this camera to precisely create narrow fields of focus in the scene for expressive and creative purposes.
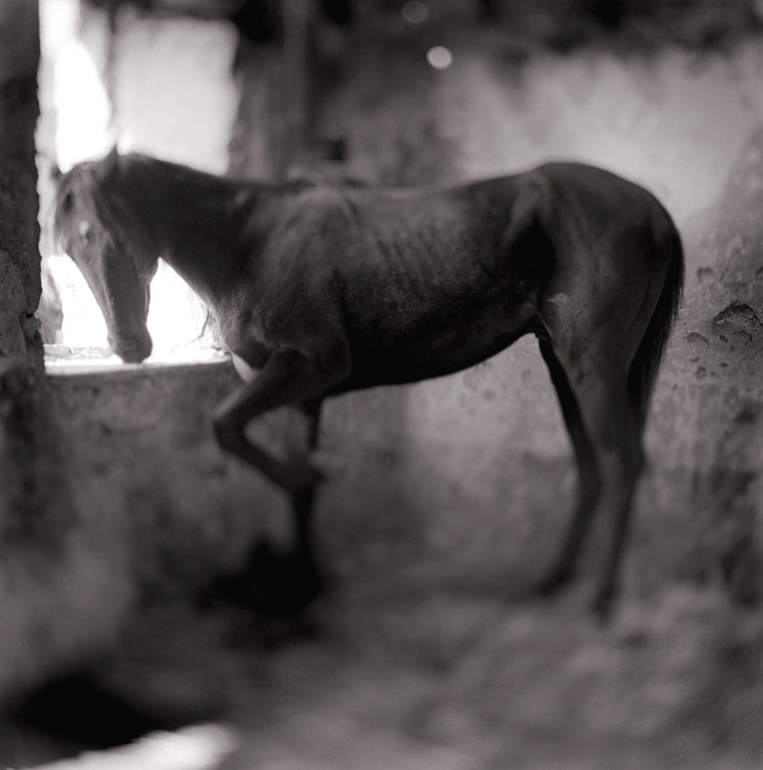 Keith Carter, young stallion, 1998
  Hasselblad Flexbody system{C}
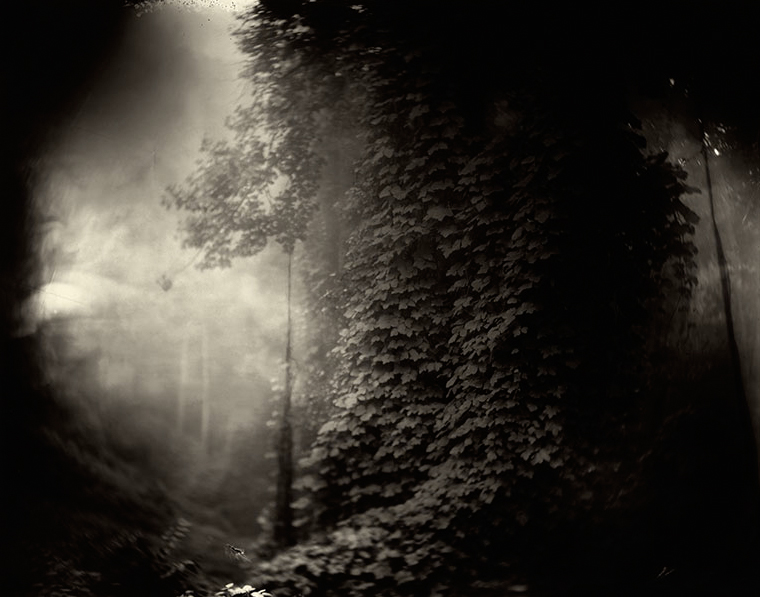
The expressive and moody nature of Carter’s images was reinvented for my Deep Forest project by creating a medium format digital camera that replicates the Hasselblad system, using several flawed components, an older digital back with the whole system not designed for in the field use. Yet, the aesthetics created by this home-assembled camera were the exact results needed to support the narrative and medium-based conceptual intents, not an easy task but one needed to effectively articulate my concept visually.
 Pierre Dutertre, Fright, 2012{C}
 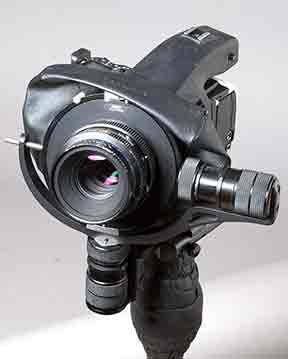 X2Pro with flawed Phase One P25 back, broken Mamiya RZ lens
 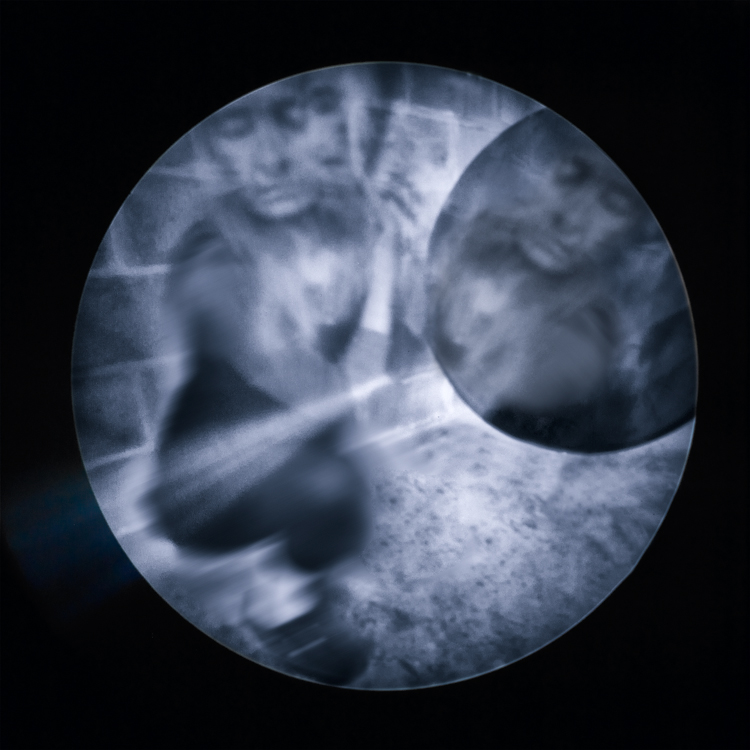 Cathy Dutertre, Foresight, 2013
  Homemade pinhole medium format digital camera
There are an almost infinite amount of decisions to be made when resolving the HOW:
What kind of focus will you be using? Sharp, soft, out of focus, partial planes of focus?
What kind of time? Frozen or slow shutter speeds, long exposures?
What kind of camera? Analog or digital, 35mm or larger formats, toy cameras, home made cameras? Flawed systems? Pinhole?
Black and White photographs? Color? Manipulated colors? Polaroid?
What vantage points?
What kind of light? Hard, bright or subdued? Night photography? Inclement weather?
What kind of compositions? Busy or quiet? Frenetic or silent?
What kind of framing? Active or passive?
As with other decisions made during the concept planning stages, the HOW is often a complex approach requiring research, innovation and some budget. Most likely you will need to experiment with the aesthetics of the images until you arrive at the perfect solution to resolve your visual intentions. In my case, it took almost a full year before I was able to build a system that allowed the desired aesthetics to support my narrative, after experimenting with view cameras, perspective correction lenses and a lens baby that was simply too imprecise.
Last, We also need to resolve the WHO, namely your audience and presentation. Knowing your audience before you begin a project can be a difficult task if the concept is medium based, such as abstractions or classical landscapes, thereby of appeal to the masses, as opposed to social documentaries, environmental issues or a feminist / gender bias, in which case your audience may be more refined. Ultimately, one needs to discern if your audience is clearly refined and in which geographical areas, where are they likely to view your work and who is potentially a buyer or collector of your work.
The location for the presentation of your images will impact your display decisions: Are you seeking a large gallery space? A museum? An intimate location? Are you printing your images very large for a visual impact? Or very small for an intimate connection with your audience? Are you going with a classic framed presentation or an installation? What kind of lighting are you faced with in the exhibit space?
These decisions are also likely to affect your choices of equipment, insofar as printing an image at 6’ by 10’ will likely require a high end medium format camera for the original capture whereas a 10” by 10” print from a cell phone could work equally as well. This leads us to consider the all important budget question. The greatest portion of your financial decisions when developing a concept resides in the final presentation method. An average size 20” by 20” print, matted and classically framed to 30” by 30” can cost around $300 plus, much more if you use the exotic but amazing Optium optically clear acrylic glass at around $600 per frame. If you have a solo show at a gallery with say 30 pieces, your initial investment is around 18K plus shipping, insurance and packaging. Again, this kind of research is important to refine during the concept development, but not as a roadblock necessarily. Cheaper presentation solutions are available and digital only showings are perhaps appropriate, although I am a firm believer that photography is never quite finished until it is printed as a firm and permanent surface for viewing. I would also say that presentation is a key link on how a concept is viewed and received by your audience, yet that step is often ignored altogether by emerging photographers who scramble at the last minute after their work is accepted into a show (crowd funding is slow and unpredictable for such a posit).
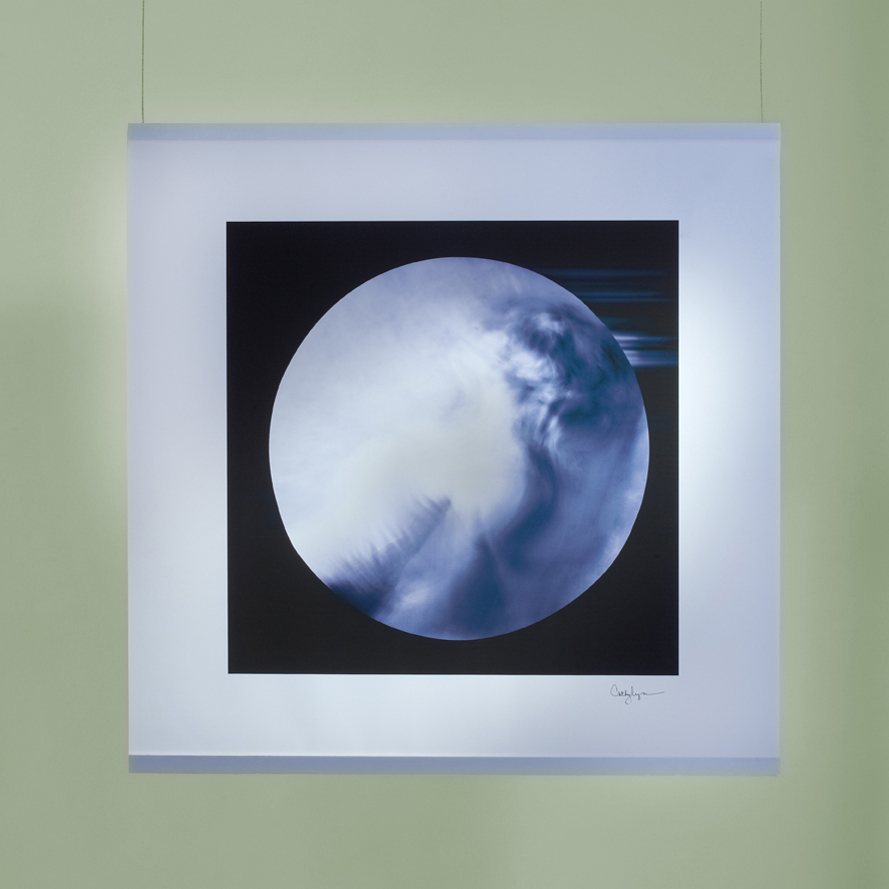 Cathy Dutertre. Installation using large images printed on semi transparent fabric, suspended by steel cables in a 3-dimensional space, back and front lighting, multiple heights and free standing. The passage of the viewer between the images will create a gentle wind motion and a soft sway of the prints.
  Pierre Dutertre, classic framed presentation, captured in the environment.
In conclusion, what separates a confused photographer from an emerging artist resides firmly in the application of a concept onto the work produced. From random images (nothing wrong with great single images, as they may well lead to a subsequent concept) to a body of unified and intellectually resolved images, lies the process of establishing a concept for your work, a direction or operations manual. It does not need to be a roadblock, or an impossible pre-visualization, an unwanted school essay or a tedious task. It however needs to be established BEFORE you begin creating images, as the only path to creating bodies of work that will surely help you grow artistically and intellectually within the medium. Your intellectual and research investments in creating a solid concept(s) will always result in growth and surprising outcomes on many occasions.
Now, let’s see you become image-makers, rather than image takers.
Pierre Dutertre conducts extensive workshops, entitled Journey Through Personal Creativity, on the topic and application of a concept based approach at the Florida Museum of Photographic Arts.
Posted by Pierre Dutertre in concept-based photography
by Pierre Dutertre
It never ceases to amaze me how many of the photographers I have taught in a variety of settings over the years approach the creation of photographs in a chaotic and reckless manner. Having packed a bag full of gear, lenses and accessories equivalent to a US Marine backpack, most photographers venture out with 16 gig media cards with absolutely no clear intention as to what they are attempting to do. After thousands of captures of inconsequent subjects with no predestined direction they return to their computer caves and attempt to “find” a good image, the posit residing in the foolish belief that if one takes many images, one photograph is bound to be good. Certainly, there exists a chance element in photography, but that is akin to relying on winning the lottery for your weekly groceries or future retirement.
What clearly separates the amateur photographer from an emerging or established artist is the application of a concept-based approach to creating a body of work that is intellectually as well as technically resolved, unified and presented in an engaging and appropriate manner. Such an approach begins with establishing a concept, the physical, intellectual and emotional answers to 4 key questions: WHAt are the intended images about, WHY do you want to create these photographs and what is the desired response from the audience, HOW will the photographs be produced to fit the concept, WHO is your audience and how does that impact these previous decisions?
All these decisions must be made BEFORE you even consider the process of taking the photographs that will support the concept.
The WHAT is the first question: Is the concept linguistically driven, the use of images to communicate a story, statement or idea (Cig Harvey, Julie Blackmon)? Or is the concept medium-based, when photography takes precedence over any message conveyed and the beauty of the image reins supreme (Ansel Adams, Clyde Butcher)? Some concepts use a mix of the above approaches, but there is always a predominance of linguistic or medium-based elements. You must also identify the literal subject matter, the real message communicated behind the photographs, as opposed to the actual subject in front of the camera. For example if you seek to illustrate poverty in America it would be simple to capture poor people, the homeless, shelters and food banks as easily identifiable subjects. On the other hand, a different approach could use images of the ultra wealthy, mansions, exotic cars, exclusive parties and so on, effectively demonstrating the gap between the poor and rich. The literal subject matter in this case is still a social study of poverty and inequality, with the actual subject being the excesses of the wealthy as a contrast that carries the intended message. In addition, you must be clear in your intentions: Do you seek to simply depict your subjects, or create a personal statement? Is your concept purely medium-based in its depiction of nature or abstracts, or is illustrative of specific social or environmental conditions? What other artistic influences impact your concept, other photographers, contemporary or historical? Do painters, sculptors or writers also influence your artistic vision?
The WHY is a deeply intellectual search for your artistic intentions: Are you just recording the scene or situation at hand (being aware of the limitations and transformative powers of the medium)? Do you seek to communicate a specific message through images? Are your images completely constructed such as still life or complex sets (including Photoshop generated or heavily manipulated imagery)? These decisions will lead to the next stage, your intended outcome for the work: Do you want your imagery to be persuasive, to change opinions or expose conditions (socio-economic, environmental, conflicts, cultural)? Do you wish for your work to become reflective, exposing your viewers to new situations (people, places or things) or your own personal visual and intellectual vision? Lastly, do you want your audience to experience the images themselves, as works of art, a mixture of personal technique and aesthetics?
 Pierre Dutertre, Weeping, Deep Forest concept, 2012
The WHAT: a medium-based concept with a strong linguistic undertone. The subject matter resides in the trees and the forest scenery, the literal subject exists within the primordial fears humans experience and project onto the environment (loss, death and life after death). The images are both expressive and form-based.
 Pierre Dutertre, Barren, Deep Forest concept, 2012
The WHY: a communicative project that approaches personal anxiety, existentialist questionings and depression. Intended to be reflective and experiential, the images offer an alternative view of nature as I relate to the environment, projecting a personal psyche onto the world at large. Influenced by Edgar Allen Poe, Jean Francois Millet, Keith Carter and Richard Copeland Miller.
In the second part of this blog, we will explore the HOW and WHO, using the Deep Forest concept as well as several others, including some collaborative work with Cathy Dutertre.
At first you may find these concept ideas overly complex or futile, but the Deep Forest concept was fully resolved and explored at length from an intellectual point of view BEFORE the first image was ever created. In effect, having a solid concept before you undertake taking any photographs is the key to becoming an IMAGE MAKER rather than an IMAGE TAKER.
More to come in part 2 next week.
Posted by Pierre Dutertre in concept-based photography

by Pierre Dutertre
The realm of infrared electromagnetic wavelengths begins close to the red visible light and continues from 750 nanometers up to 1000,000 nanometers within the deep infrared segment, also known as FIR or heat seeking cameras for law enforcement and military applications. In terms of photography, filters start close to visible light (with some odd color renditions) and progress from 665nm, 720nm and 830nm as the deepest filter usually available with practically no ambient color captured.
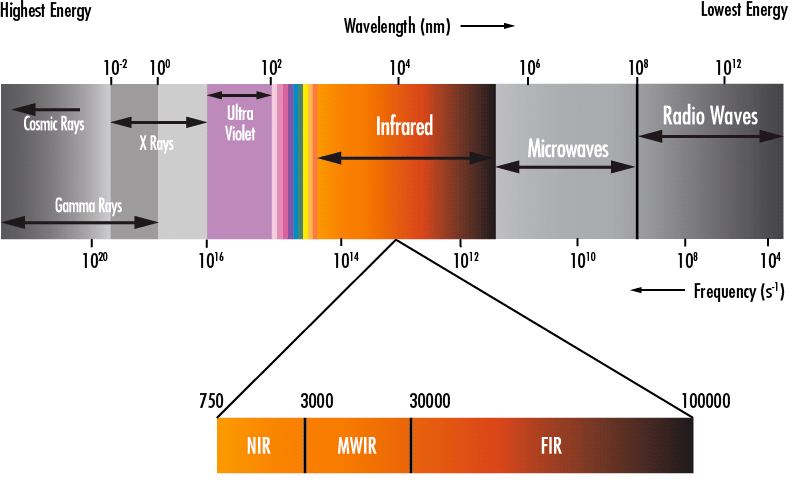 Electromagnetic wavelength chart
Traditionally, an infrared filter can be applied to an unmodified digital camera but it will result in average results due to the existing IR and UV filters already applied to digital sensors that will negate the capture of infrared wavelengths to some extent. In addition, and beyond the 6 or more stops of sensitivity losses, the camera must be fixed on a tripod and the scene framed before the application of the filter that will render the viewfinder useless due to its extreme density.
The alternative resides in having a DSLR permanently modified by first removing the IR and UV filters already present in the sensor and subsequently attaching an infrared filter. This is a complex operation, relatively expensive, but one that can be reversed in the future with an additional investment. Due to the very delicate nature of this process only a few labs can successfully actuate this modification in a clean room environment. http://www.lifepixel.com/ is a reliable company that we have used on several occasions, offering many different filter wavelengths for a variety of results (many of which will quickly become a novelty and mundane after a short while).
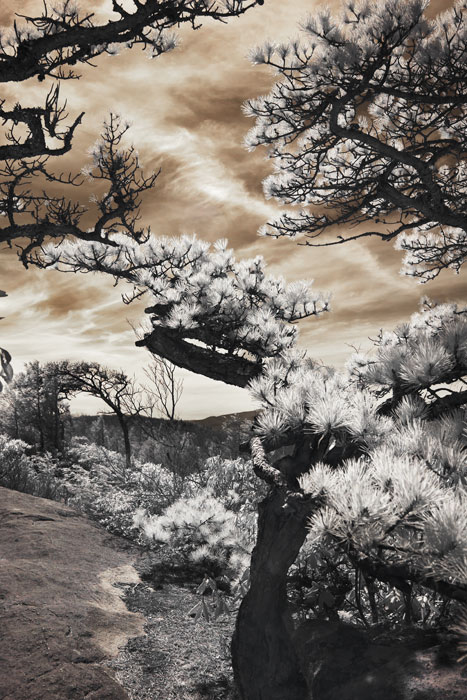
 Pierre Dutertre, 2012, Canon 5D, 720nm, 35mm lens
The drawbacks of a permanently modified IR DSLR are worth mentioning. Besides the loss of sensitivity, roughly 6 stops of exposure and an increase in noise, the infrared wavelengths do not fall on the same plane as visible light. This necessitates the operator to manually adjust the focus very slightly clockwise (from the photographer’s point of view behind the camera). Many lenses have a small red dot as an indication of the shift in focus. Auto focus lenses are tricky to get the focus right and work better in manual focus mode. However, Lifepixel can adapt a specific auto focus lens to focus automatically for an IR image (at additional costs, including shipping), yet this is often a process fraught with uncertain results. Finally, some lenses will produce a hot spot in the center of the frame as a result of the internal coatings of the elements, with post processing as the only remedy.
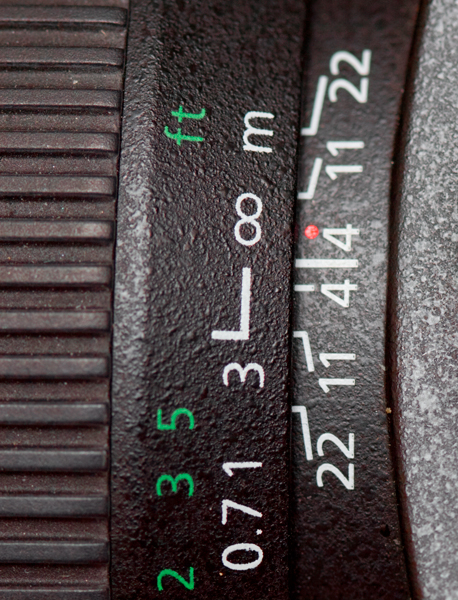 . Infrared focus indicator
Ultimately, the choice of converting a camera into an infrared system must reside within a clear artistic concept, the pursuit of the unseen as part of the magic of the medium. If such a system is used for expressive and creative outcomes, the novelty will not wear off after a few weeks. Keeping to a 720nm or 830nm filters can also prove aesthetically valid, avoiding the weird and false colors of filters with a lower wavelength. Our current IR camera is based on a Canon 5D MKII modified with a 725nm filter made by Jenna Optik in Germany, a very thin filter that produces little noise overall. It is in constant use within many different genres, including self-portraiture. Our preferred lens for this custom system is a Canon TS-E (tilt shift) 24mm f3.5, manual focus that enables precise focus planes in addition to clear infrared images.
 Pierre Dutertre, 2012, Canon 5D MKII, 725nm, 28mm TS-E lens
Using a permanently modified IR camera involves creating a custom white balance, usually a solid green background, and applying it at the beginning of the captures, thereby avoiding a strong pink cast. Different hues of green will also produce varied effects, and to that extent we have a library of custom white balances for variable lighting conditions. Infrared captures are best achieved with strong contrast and a mixture of sunlight and clouds, with anything green in the scene turning pure white; low light produces a completely different effect, more moody and mysterious. Finally, the bronze background color of a 720/725nm filter can be inverted in the channels to a saturated cyan/blue for yet another kind of visual interest
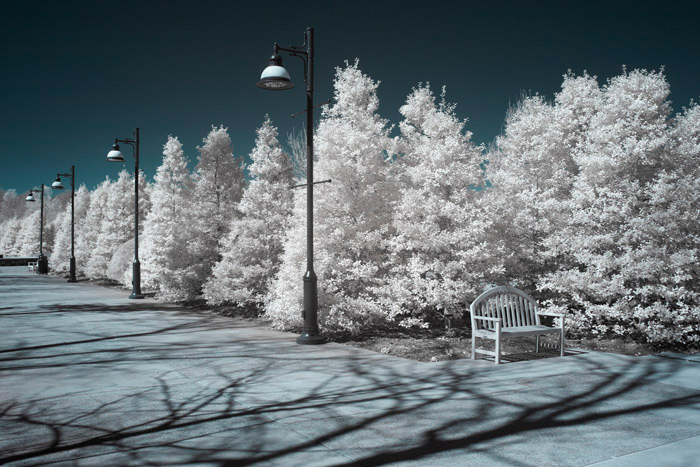 Pierre Dutertre, 2013, Canon 5D MKII, 725nm, 28mm TS-E lens, blue conversion
  Cathy Dutertre, 2012, Canon 5D MKII, 725nm, 28mm TS-E lens
 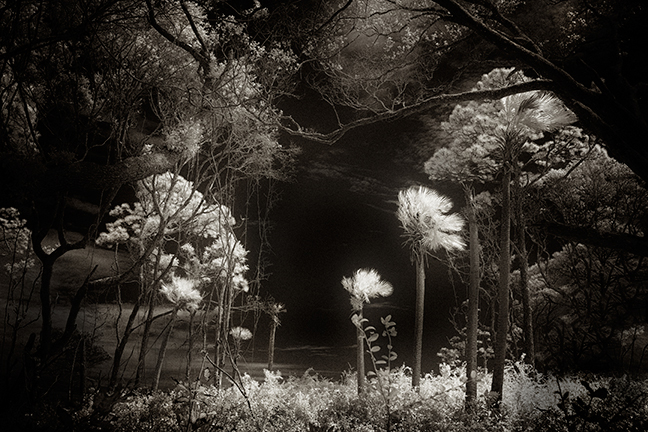 Cathy Dutertre, 2013, Canon 5D MKII, 725nm, 28mm TS-E lens, black and white conversion
By Pierre Dutertre. Artist, Educator, Photographer

Recent Comments