by admin
The Use of Natural Low-Light and Neutral Density Filters in Concept-Based Landscape Photography
I want to thank UPA Gallery – and Pierre Dutertre in particular – for inviting me to write this guest blog. I’m grateful for the opportunity to introduce my work to the readers of this unique educational blog and appreciate UPA’s commitment to giving exposure to emerging fine art photographers.
Stormy Weather
Monster hurricanes… saturating heat … biblical rains … what’s not to love about summer in Florida? At least when it comes to photography. When the skies turn dark and stormy and people seek shelter indoors, I grab my camera gear and go to work outside.
In this blog post I’ll review how I use low-light conditions – especially rainy low-light conditions – and ND filters in my concept-based landscape photography, specifically for lighting aesthetics and water-blur effects. We’ll take a detailed look at two images from my Florida series, called “Remnants,” to see examples of how I approach low-light conditions with and without ND filters.
First, it’s important to understand what an ND filter is. Basically, it’s a lens filter made of dark glass (like sunglasses) that reduces the amount of light reaching a camera’s sensor. This allows for much slower shutter speeds in order to create motion-blur effects, among other things. There are different kinds of ND filters – slot-in, screw-on and variable – each with different density ratings that give various f-stop reductions. There are pros and cons to using each type that’s beyond the scope of this blog post, but a quick Google search using the terms “ND Filter” will pull up many useful articles for further reading.
Natural Low-Light Effects
My Florida portfolio is called “Remnants” on www.scottbolendz.com . It documents small moments of modest natural beauty – what I call the “diminished sublime” – in remnant green spaces along Florida’s heavily developed Gulf Coast. The images have a delicate, compressed, dream-like quality due to the contingent, often fleeting, nature of the depicted scene. This project is influenced, in part, by Clyde Butcher’s Florida series and Michael Kenna’s long-exposure work.
I like shooting in rainy low-light conditions because the camera can transform a relatively mundane landscape into something otherworldly. Such low-light is often sufficient by itself for longer exposure times, which can be especially useful if groundwater is present (as is often the case in Florida). One of the challenges of shooting the lush Florida landscape is the visual complexity of the vegetation. Water reflections often add distracting elements to an image (at least to my eye). Longer exposure times, however, can soften or even obliterate water reflections and give a smooth, silky, almost dream-like surface plane that can add depth and simplify a composition. ND filters allow for even longer exposure times when necessary.
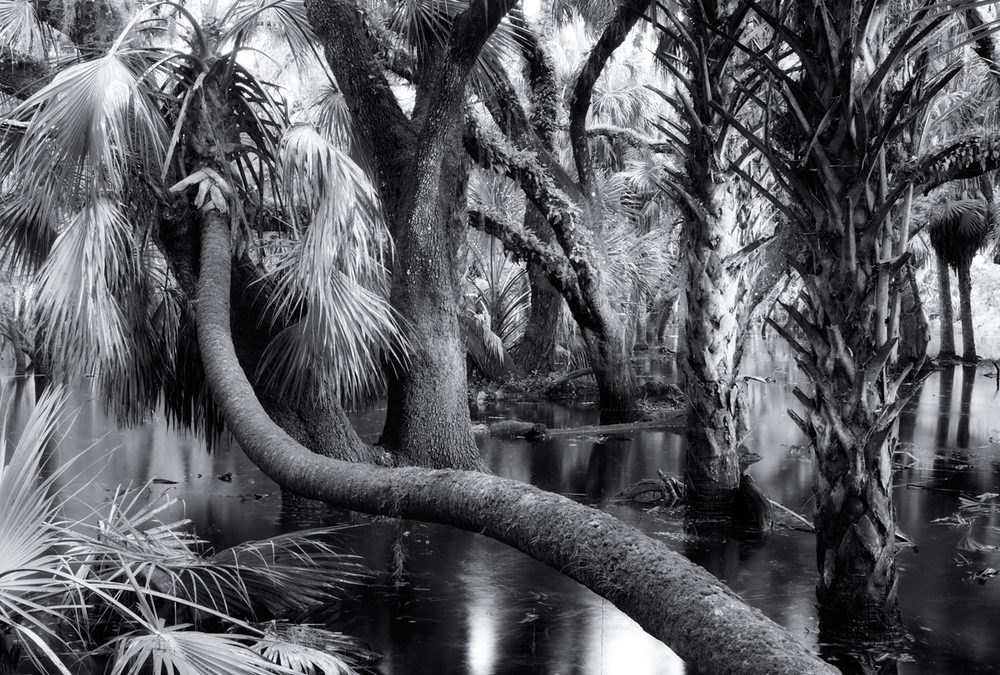
 “Myakka Park Drive 1, Sarasota” by Scott Bolendz
My photograph “Myakka Park Drive, Sarasota” was shot immediately after a thunderstorm. I set my Nikon D600 on a tripod (a definite must for long-exposure work!) and tried to get a long exposure time without using an ND filter. I was using a Nikkor 24 mm/2.8 prime lens. I set my camera/lens to manual focus (infinity), aperture priority f/16 and ISO 100 which gave me a shutter speed of 5 seconds. This was long enough because raindrops were still falling from the wet foliage onto the groundwater surface, creating small disturbances that would help in achieving a nice water-blur effect. This, in turn, would create a clean background plane to highlight the layers of lush, complex foliage. And – voila!
ND-Filtered Lighting Effects
 “Remnant Mangrove, Tampa Bay” By Scott Bolendz
My photograph, “Remnant Mangrove, Tampa Bay”, was shot at mid-day using a 64x ND filter during a brief interlude between coastal storms at Emerson Point in Bradenton, Florida. The clouds and water were both moving slowly, but the light was too bright for longer exposures without the benefit of an ND filter. Even at f/22 and ISO 100 the shutter speed was 1/20 second (too fast for motion-blur).
I only carry 2 high-quality screw-on ND filters: a 64x (6-stop reduction) and a 1000x (10-stop reduction). These 2 filters offer a decent range of f-stop reductions for most lighting situations I encounter.
The workflow for this image is more involved because it’s necessary to compose and meter the scene prior to attaching the ND filter (the viewfinder is too dark when the ND filter is attached):
1. Set the camera on a tripod.
2. Use manual focus (set to infinity) and frame the scene – I used my 24 mm prime lens.
3. I metered the scene using aperture priority f/22 and ISO 100 for the longest exposure possible prior to adding an ND filter.
4. Next, check the shutter speed. It was 1/20 for this particular camera setting.
5. Enter the 1/20 shutter speed value into a long exposure calculator (free apps are available on iTunes!) to see what new shutter speed would be required for a similar exposure if a 64x or 1000x ND filter were attached. The results: 3 seconds (64x) and 51 seconds (1000x). Based on current conditions, I chose the 64x.
6. Next, put the camera setting on full manual and replicate all the previous settings from aperture priority (f/22, ISO 100, etc…) and select a new shutter speed of 3 seconds (to account for the 64x ND filter).
7. Carefully attach the 64 x ND filter to the prime lens.
8. Use a wireless shutter release or the camera’s timer to take the picture.
I often have to increase or decrease the calculated shutter speed based on what the first captured image actually looks like on the camera’s LCD screen. The image may be under or over-exposed (I only shoot RAW files so I can tweak the exposure in post-production). If you decide to re-compose the image, remove the ND filter and start the process all over again.
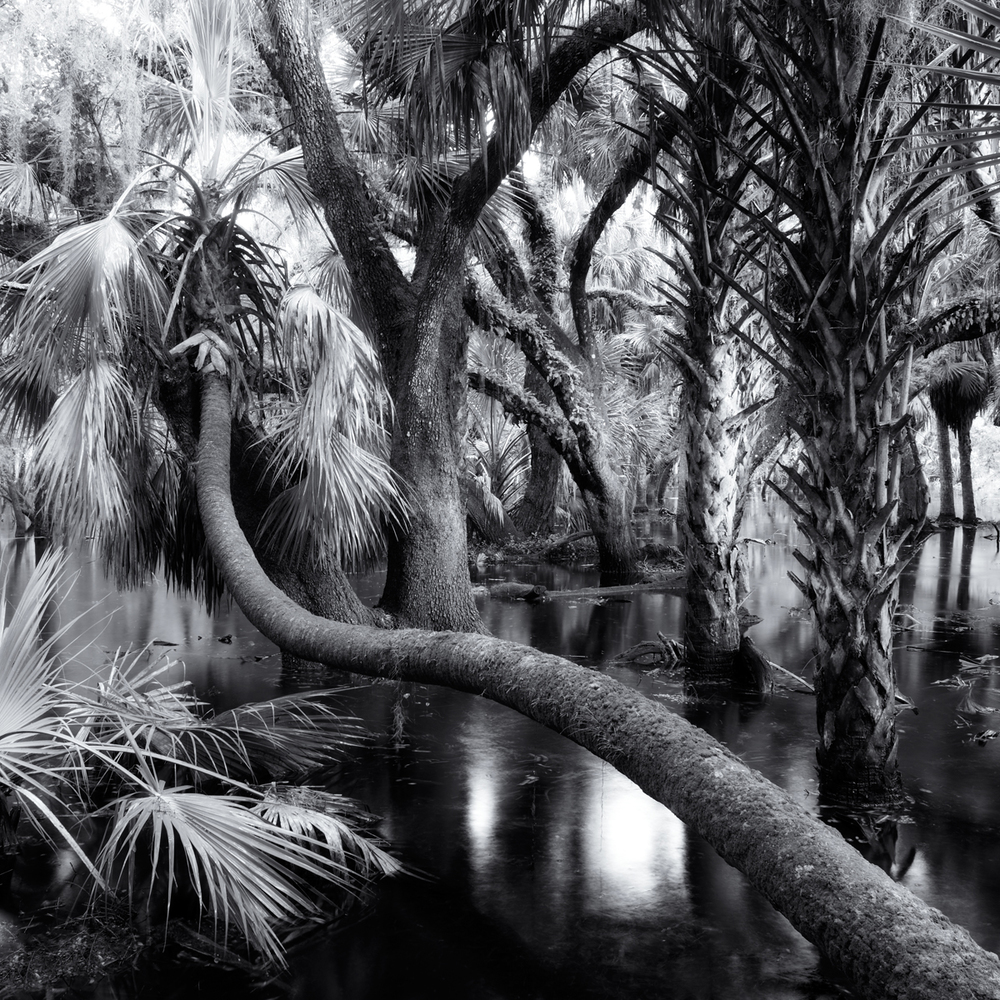
Here are a few more examples of my Florida series shot in rainy low-light conditions with ND filters. Again, notice how the blurred water surface provides a clean plane that nicely highlights a visually complicated subject.
 “Remnant Mangrove, Terra Ceia Bay” By Scott Bolendz
 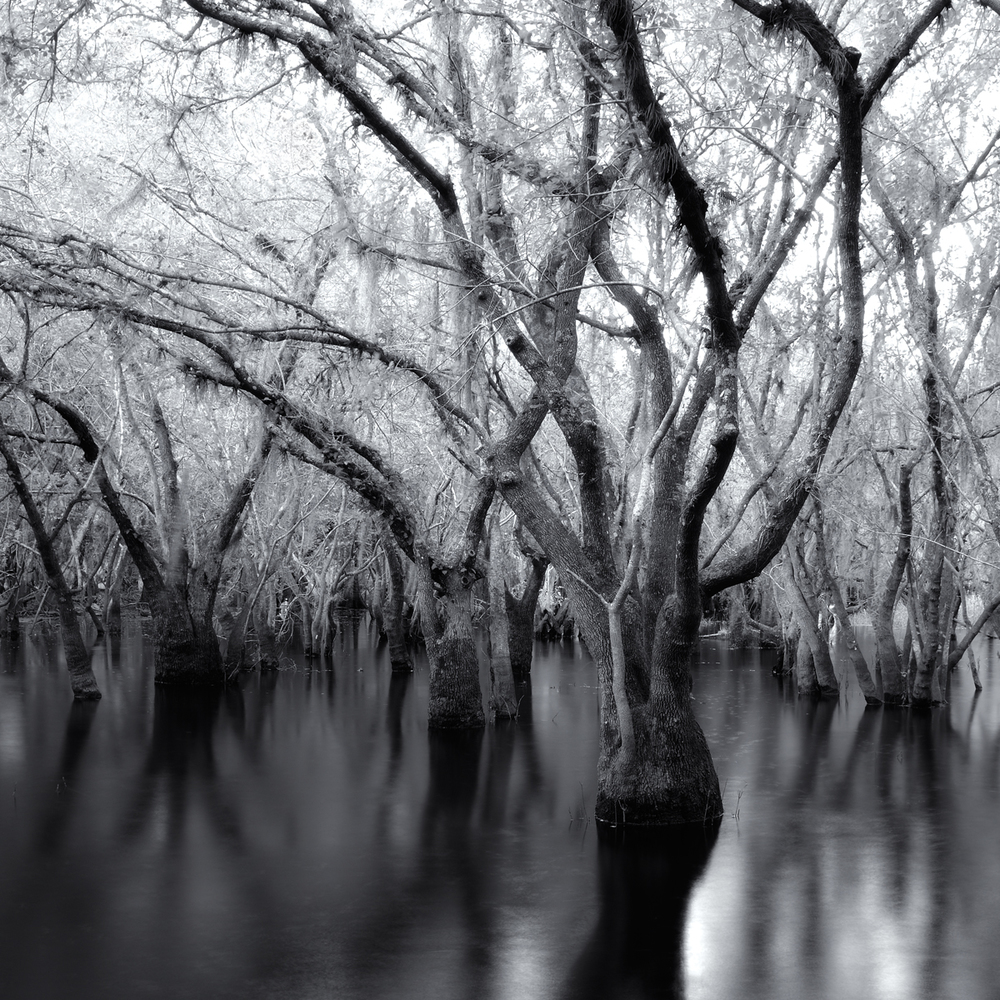 “Myakka Park Drive 2, Sarasota” By Scott Bolendz
Some final thoughts
First, since I mainly shoot with a prime lens for my Florida series, the workflow process described in this blog post applies to prime lenses. Use of an ND-filter on a zoom lens is a somewhat different – and more difficult – workflow which I will review in a future UPA Blog post. Second, when shooting long exposures for either water or cloud-blurring effects, it’s important to be aware of even slight movements of your subject. This is less of an issue if the subject is a mountain or city buildings. But with vegetation and wind movement – like coastal mangroves, for example – you may need to be very patient until the subject is absolutely still. And if you’re shooting in rainy low-light conditions, patience is a virtue!
Scott Bolendz is an emerging fine art photographer. His landscape work has won several awards at The Florida Museum of Photographic Arts in Tampa. To see more of his images you can visit his website www.scottbolendz.com or follow him on Facebook at “Scott Bolendz Photography.”

by admin
The Technique of Variable Planes of Focus for Reflective Artistic Outcomes
 Photo by Pierre Dutertre
View cameras, with their ability to independently move the front and back standards to generate sharp images within complex environments where the detail of a product or structure has to be fully rendered, have been around for well over a century. Architectural photographers have used the swings, tilts and shift functions of their view cameras to generate accurate, fully focused and standard renditions of interiors and exteriors, ensuring perfect vertical lines and recording the fine details of a particular space or building. Commercial artists have indeed been fortunate to control precise planes of focus to accurately represent products without distortion and with immense or a very shallow depth of field. This was predominant in food photography, where only a small portion of the image would be in focus, thereby creating a visceral and imaginative reaction with the viewer.
However, this ability to precisely control 3-dimensional planes of focus (also known perhaps incorrectly as selective focus) can also be utilized by the creative artist who desires to highlight a particular point of interest in a scene, directing the viewer to an area of interest as intended for a concept-based reflective intent. This technique relies on the ability to move the lens 3-dimensionnally, with the equivalent of the swings and tilts available in a view camera format. There are several alternatives that replicate the front movements of a view camera, from the easily attainable to the exotic. The beginning point resides in a lens baby set-up available for 35mm DSLR cameras.
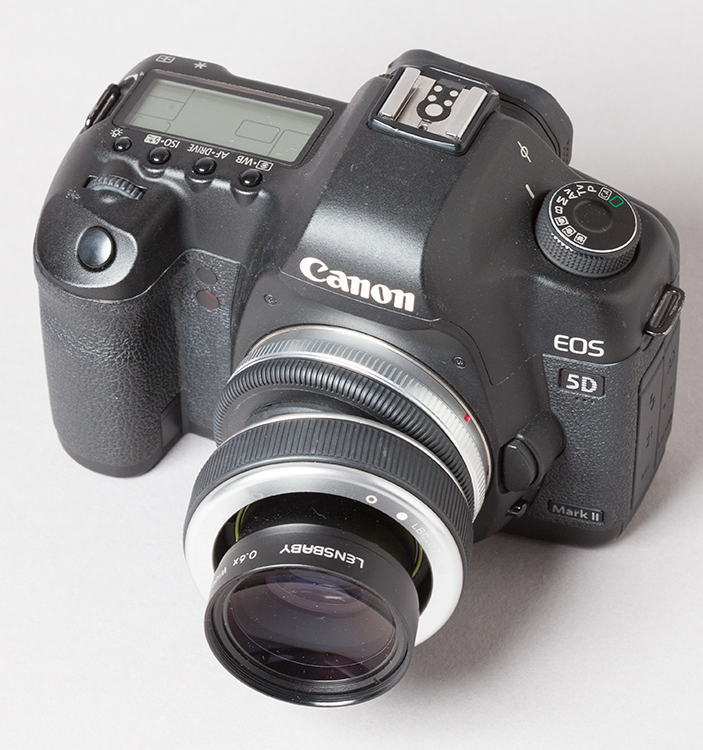 Lensbaby, Tilted
The operator can simply twist the lens in multiple directions to generate a fairly precise 3-diemnsional plane of focus.
The results can be very creative in isolating certain parts of the scene in order to create a mood or an ephemeral and mysterious image that denies a full view to the viewer, allowing for directed and controlled points of interest and therefore an artistic communication, resulting in a reinterpretation of the scene by the viewer.
 Photo by Cathy Dutertre, 2012
  Mounted Canon PC Type Lens, Tilted
Perspective correction (PC) or tilt-shift lenses for 35mm and medium format cameras have been primarily used by architectural photographers in order to control perspectives and distortion, but these exotic prime lenses can also be used to imbue a distinctive style and content to an image.
The Canon TS-E 24mm f/3.5L II allows for shifts and tilts, but can also be rotated to create a similar result of the lens baby, yet preserving a superior optical rendition.
 “White Knight” by Cathy Dutertre
At the high end of the spectrum, one can use the X2 PRO system created for medium format and 35mm digital cameras, replicating the precise movements found in a view camera that otherwise may not be the best suited tool.
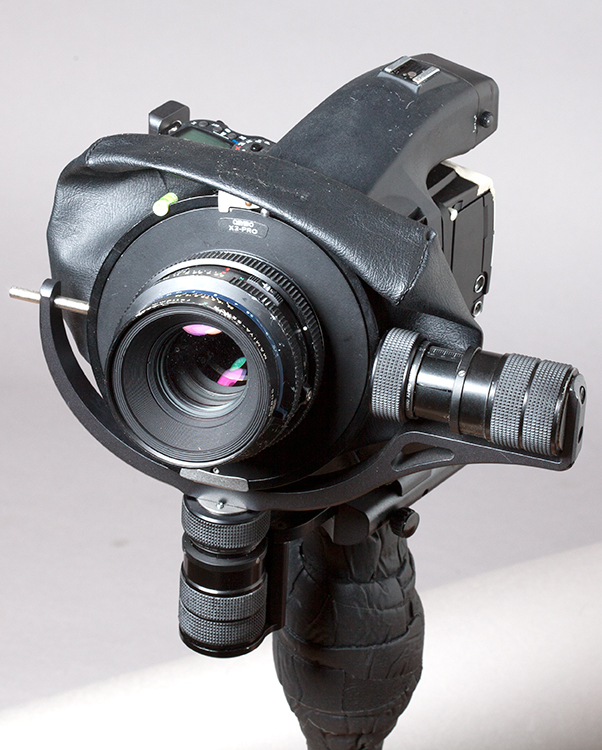 X2Pro, Fully Extended
Although created for studio use the X2 PRO is still manageable on location as in my personal use, despite the bulk and weight of the complete assembly. Mounted with a refurbished Mamiya body, a flawed Phase One P25 digital array, an ancient Mamiya RZ lens and a monopod, this rig has been a mainstay of many of my personal projects, allowing me to precisely control the 3-dimensional planes of selective focus to convey a mood and expressive / reflective artistic outcome. From a banal scene, I am able to extract the essence of a particular subject in order to imbue the image with a communicative message, the real subject matter that transcends the recording abilities of the medium.
 “Dawn” by Pierre Dutertre
  “Weeping” by Pierre Dutertre
In effect, the technique of variable planes of focus imitates to some extent our human vision, monocular eyes that have a central point of sharpness, blurred peripheries and adjustable parallel focusing. The ability to push beyond these organic parameters with 3-dimensional planes of focus allows for a creative outcome, making images that are precisely controlled to add a quasi surrealist feel and mood, deconstructing unnecessary elements that do not support the concept, and creating engagement with the viewer as they examine a reconstructed reality as a personal communicative effort on the part of the artist.

by admin
Photographing the Night
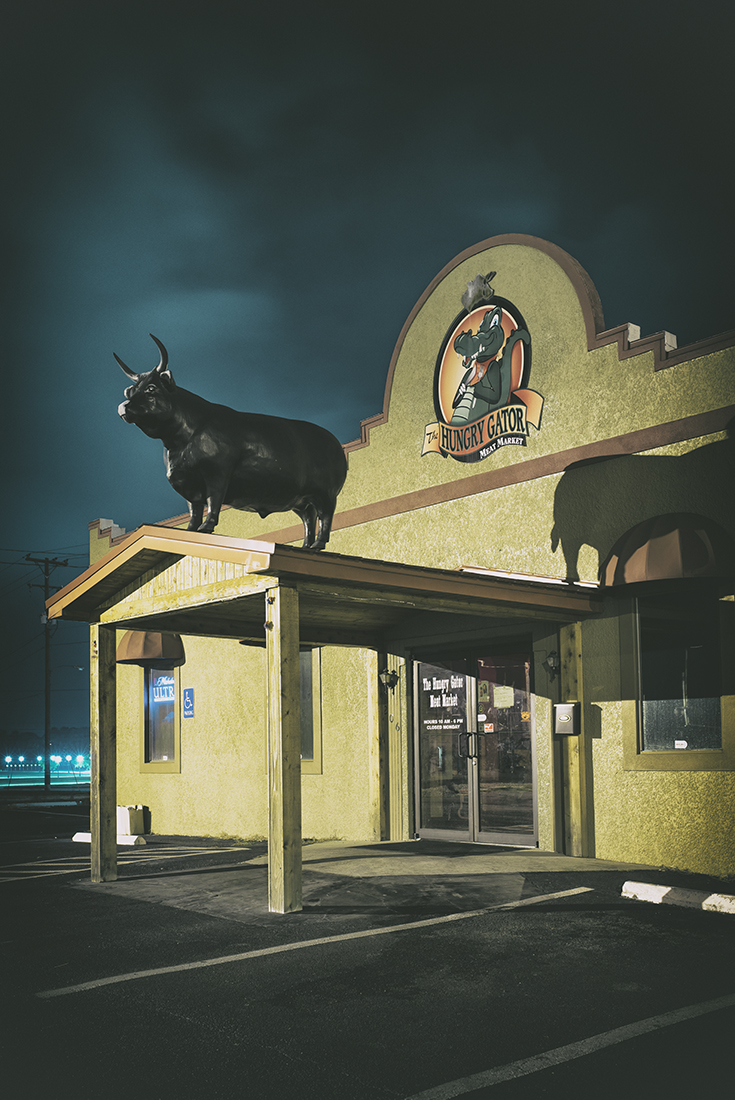 Hungry Gator & Bull
Ah, night photography. Camping out under the open sky, recording trails as the stars creep across the heavens, exposing the glorious Milky Way as only a camera can see it…
Nope, that’s not happening in the city!
A Persistent Love
One of my favorite kinds of photography to both create and view is nighttime exposures of urban light. I have always felt such an affinity for the nighttime. By nature, I’ve always been a bit nocturnal, at my best after sun down. For this reason, nighttime urban photography exists within a deep affection that I may never let go of. Prowling around when the sun has hung up his hat for the night, the light and shadow begins to play in an artificial dance under the street lamps. Photographs made of the night hold such mystery and magic for me. Shadows become distorted, colors become surreal, static scenes whisper a different story than the one they assert in daytime.
Below are two examples of daytime versions using some of my favorite nighttime photographs as guides.
 4PM versus 4AM, Day & Night Opposites
 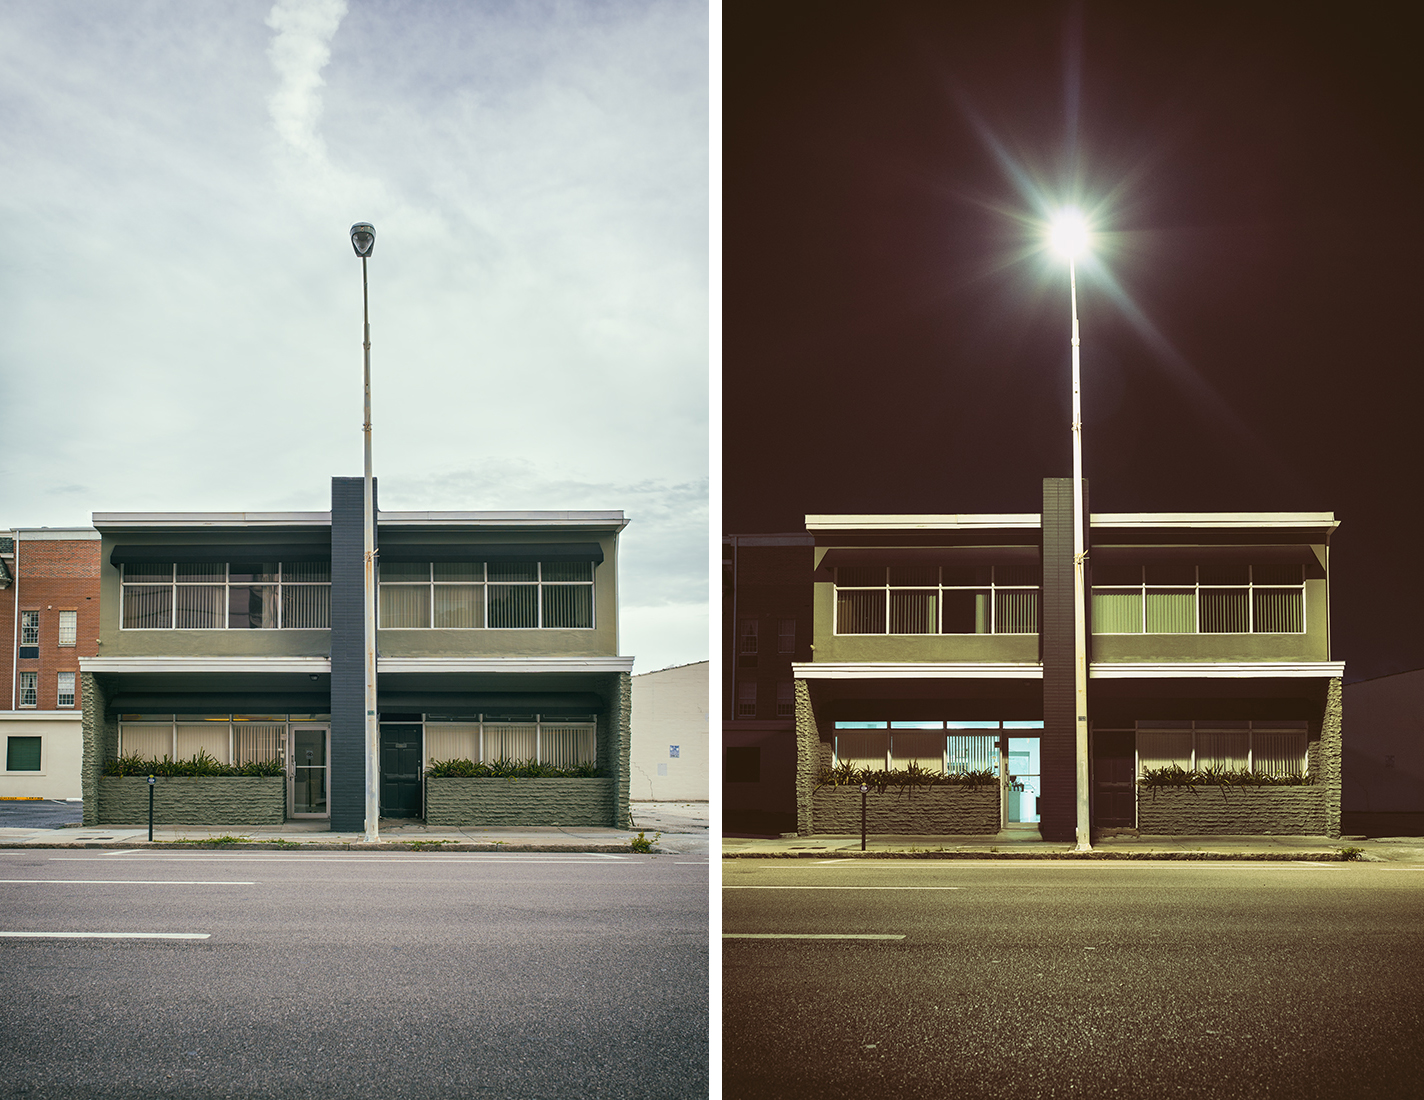 Day & Night Opposites, Featuring the photo “Lure”, by Linz Welch
Looking at these comparisons, the daytime counterparts don’t hold the ambience and clandestine personality I seek. The stark atmosphere and deep darks of the evening versions call for my investigation. The photos in daylight just seem more still and obvious in their existence to my eyes.
My Trusty Steed
During the night, one of the most important pieces of equipment for me is a solid, yet packable tripod. A good tripod is integral to my style of photograph creation at night, as most of my nighttime exposures are from 15 seconds through 4 minutes. I tried many models of tripod before finally discovering my beloved 3 Legged Thing. This is a really gorgeous and understated tripod. It remains versatile, while being just enough unlike other tripods to feel like it is more than only a utilitarian item. On that note, I’ll stop making verbal love to my tripod here, and save the review for later.
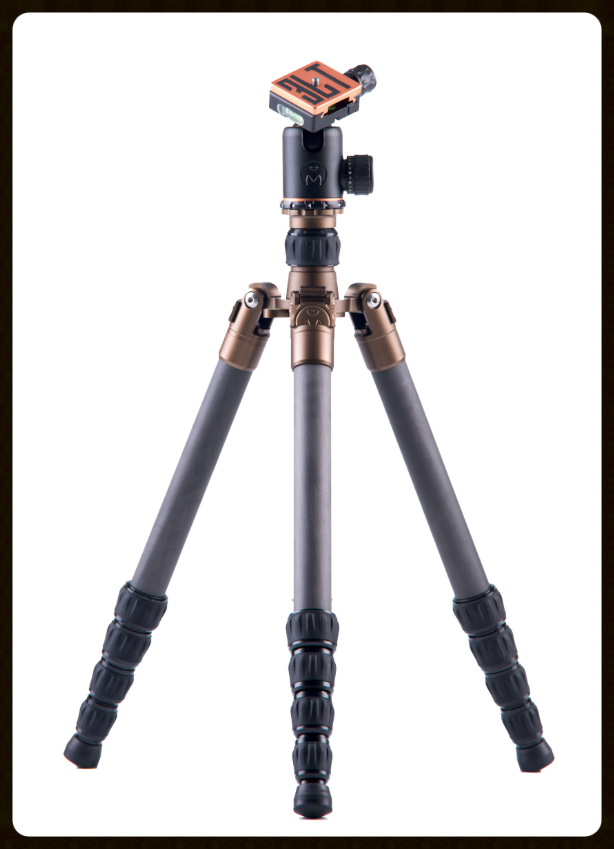 3 Legged Thing: Eddie
The two most important aspects of this tripod choice are that it is carbon fiber and only about 16.5″ folded. Carbon fiber is important because it resists transmitting vibrations up through the camera while remaining much lighter than other materials. The solid foundation stops speeding traffic from causing shake to my longer exposures. Carbon fiber is also ceases vibration faster than metal, so wind and camera shutter slap is more easily damped. The small size and weight means that it can fit inside my backpack, allowing me to carry only one bag which makes those long treks through the sub-urban jungle more bearable.
Another piece of equipment you will find in my bag is actually the one you won’t find. I almost never use flash in my night exposures, preferring to work with the conditions as I find them.
In The Best Light of the Light
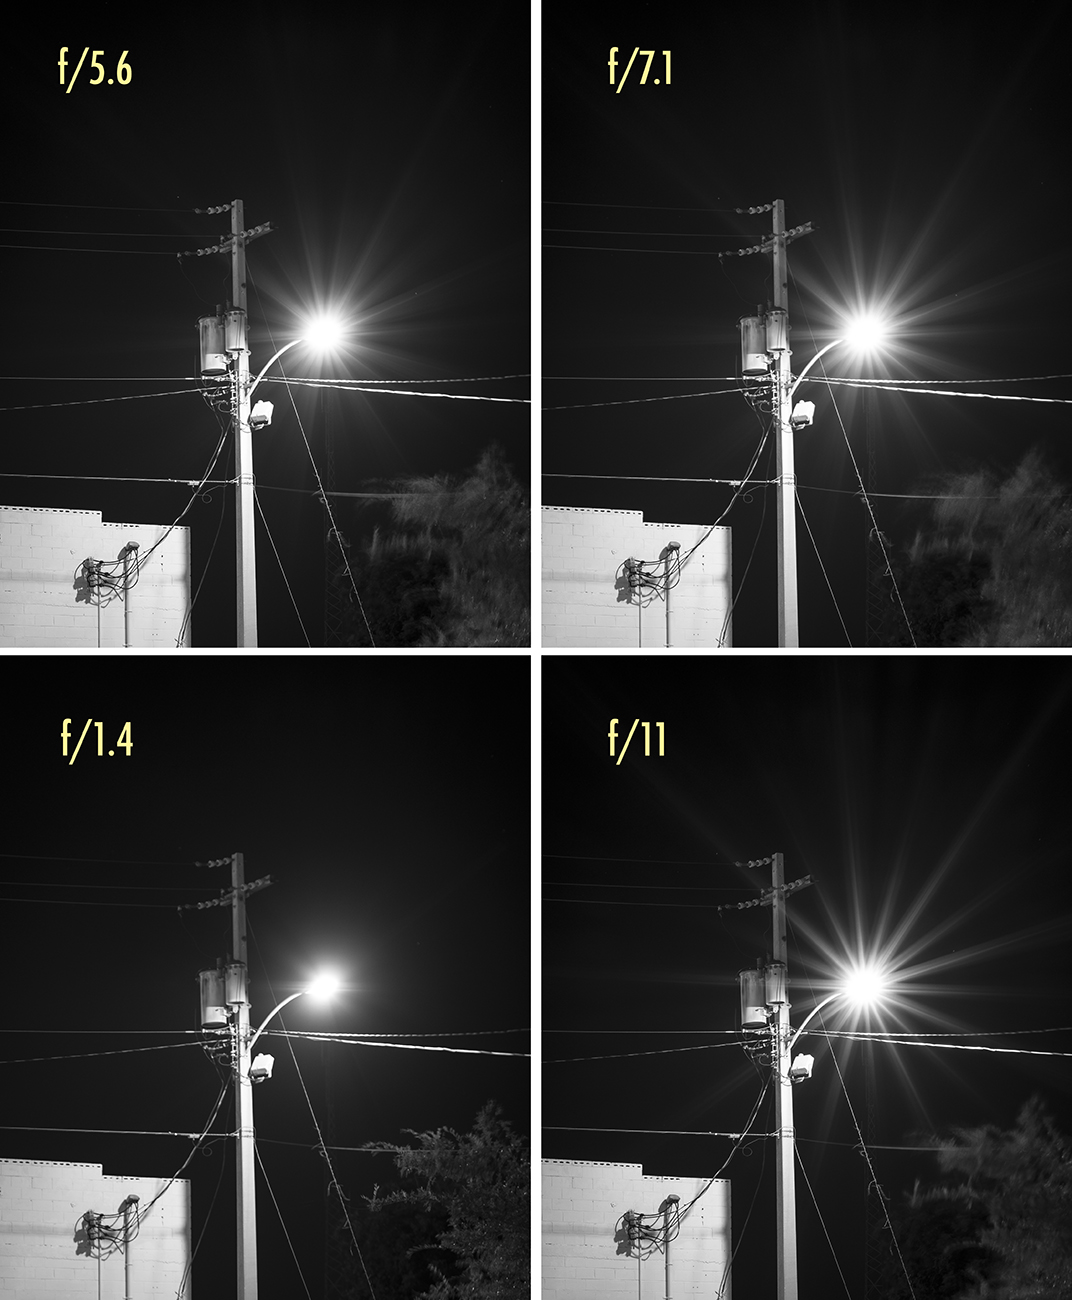
When creating photographs that include light sources, one of the most essential aspects to me is rendering the visual character of the light as I see it in my minds eye. For this reason I choose to almost always stay within the aperture ranges f/5.6-7.1 despite loss of depth of field and complete sharpness throughout. While this exact setting can vary dependent on the lens’s construction, this is what is true of the lenses I am currently using. However, what remains always true is: the smaller the aperture (higher number, ex f/11) the sharper the light appears when it enters the lens; and the larger the aperture (smaller numbers, ex f/1.4) the more hazy the light, as it has a larger opening through which to enter.
 A Comparison of Different Flares
As shown in this picture, the top two examples at f/5.6 and f/7.1 are the kind of light source flare that I am simply in love with. It just barely begins to form a star while remaining slightly ethereal and equivocal. In the example for f/1.4, the light source has no personality; it just sits there and adds nothing of itself beyond the light in the scene. In the f/11 example, the star effect feels too abrasive; too sharp and defined, it begins to call all attention to itself as its shape geometrically contradicts all other forms in the photo.
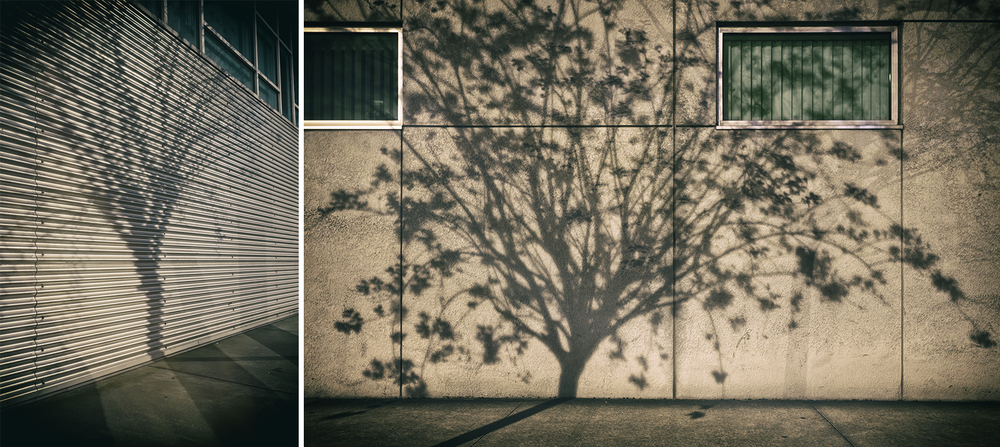 Nighttime Shadow Trees, Featuring the photo “Stand”, by Linz Welch
A Few Tidbits To Remember
Having my ideal aesthetic and foundation in mind, there are a few more pieces of advice that are essential to a night of photographic urban safari. Below is a list of things to consider when setting out with a camera after sundown.
-
Do use a tripod and remote, or the camera’s self-timer.
Touching the camera while activating the shutter button can cause unwanted blur.
-
Do be aware of surroundings and never be in the way.
Sometimes photographing empty areas at night can be a bit of a risk, be aware of who is around you and evaluate potential risks. The sad truth is there are people out there that might take the opportunity to run away with your gear! On the other side of the equation, be aware that when deploying your tripod, you don’t want to hinder vehicle or walking traffic around you, or cause people to trip on your tripod. It’s best to find an unobtrusive area you can hang out in, thus allowing you to concentrate on capture.
-
Do look at the way the light changes the subject.
You don’t have to have use street lamps necessarily, but interesting lighting conditions are optimal studies for the conditions that are only available at night.
-
Don’t expose for the subject, but rather the quality of light.
The object here is to do the most justice to the light itself, with the exposure of the subject being complementary to the light.
-
Don’t be afraid of the mundane, sometimes the simplicity of the light is all that’s needed.
At times, simplicity wins; all of the interesting angles and perspectives can’t compete with good old fashion geometry. Don’t be afraid to try the obvious approach.
-
Don’t be temped into high ISO settings.
The lowest ISO and long shutter speeds will maintain subtle gradients and dark tonalities. As noise or grain in the media increases, details can become mushy and unique nighttime tonalities can be lost. Don’t be afraid to open the shutter for several minutes or more.
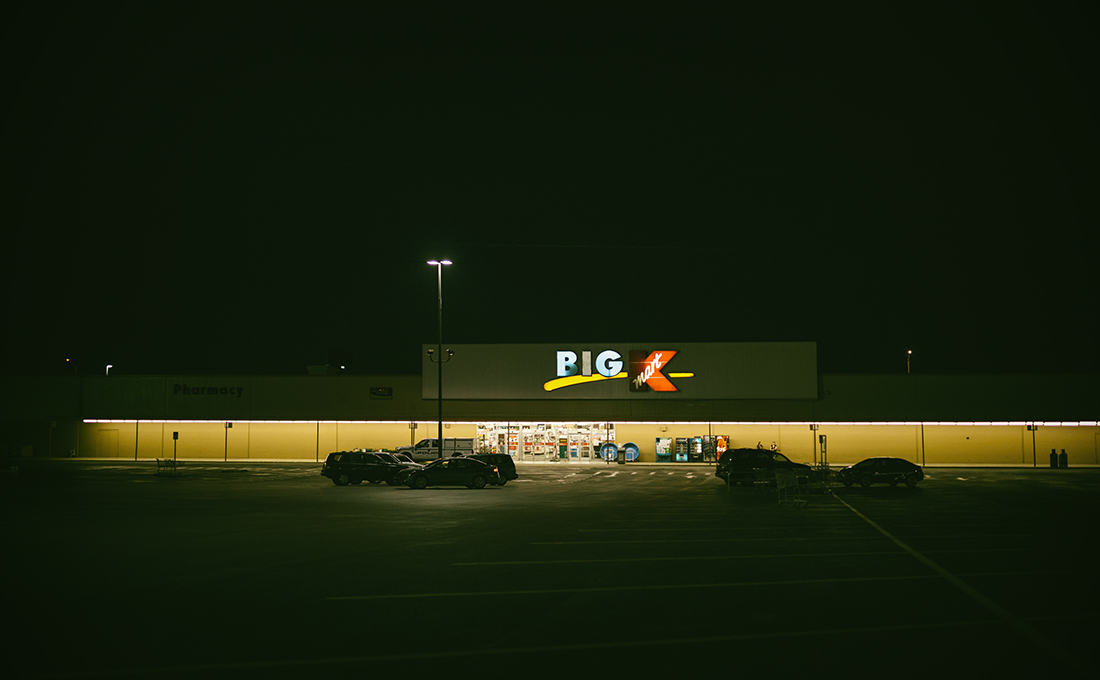
 “The Path of Night”, by Linz Welch
Into the Night
I hope you’ve enjoyed reading my approach to stalking around in the dark. As you can see, not all photo adventures need to take place in waking at 6am, and some of the real jewels only become apparent in the evening. Our modern days are so busy, and full of running from here to there, that we often forget to enjoy this world of artificial light we have created for ourselves. Of course with it, all the stars of the heavens are missing in action as more sprawl brings more light pollution. Finding stars for photographs means venturing ever farther away from home for many. However, rediscovering the uniqueness of the world of man, as seen at night, means adventures can also be found in just a few steps outside.
Well, what’re you waiting for? Get out there and lose some sleep to the glory of night photography!
 “Pig < “, by Linz Welch
by admin
Optical Blur for Expressive and Creative Outcomes
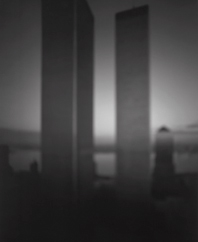
 World Trade Center, 1997 by Hiroshi Sugimoto
Optical blur, or in other words the lack of sharpness and detail in a photograph, is an integral part of the limitations of the medium that can be used to effectively change the scene captured and reconstruct, reinterpret, the world around us in a communicative output. As Hiroshi Sugimoto, a contemporary photographer who has successfully used optical blur via defocusing a view camera to illustrate a massive project and book on architectural icons worldwide, declares: “It is about seeing the thing itself rather than the thing”. http://www.sugimotohiroshi.com/architecture.html.
As our eyes are assaulted by a flurry of confusing details within any scene or environment, the deliberate act of removing such details precisely and controllably with the technique of blur allows the artist to communicate his or her personal communicative view of the essence of the world to the viewers, in an expressive and experiential reinterpretation of the mundane or iconic.
 Early Figure of Camera Obscura
Optical blur can be achieved with a variety of methods, from pinhole applications to flawed optics and manually defocusing lenses, but originally started with the camera obscura, a pinhole system that is at the core of photography and originally used in the Baroque period by many Lowlands painters to accurately draw complex and sometimes contained perspectives, such as the interiors of Johannes Vermeer. From the inception of the Daguerreotype onwards, great advancements in the resolution and quality of optics resulted is sharp images with immense depth of field, the desired result with photographs up to our present time when digital camera manufacturers tout the ubiquitous amount of clarity and detail regarded by the public as quintessential to a “good” image. The Pictorialist movement of the late 19th and early 20th centuries sought to reverse that trend in order to place photography as its own art form, closely following the established medium of painting as its stylistic and subject matter influences. In that desire, one doomed to last only a few decades before modernism dismissed the failed aspirations of the pictorialists, flawed optics and pinholes were commonly used together with the gum bichromate and platinum processes to render ephemeral images lacking detail and with limited or non existent sharpness. Such an example can be seen in the iconic image by George Davison, “The Onion Field”, 1889, one created with a pinhole camera.
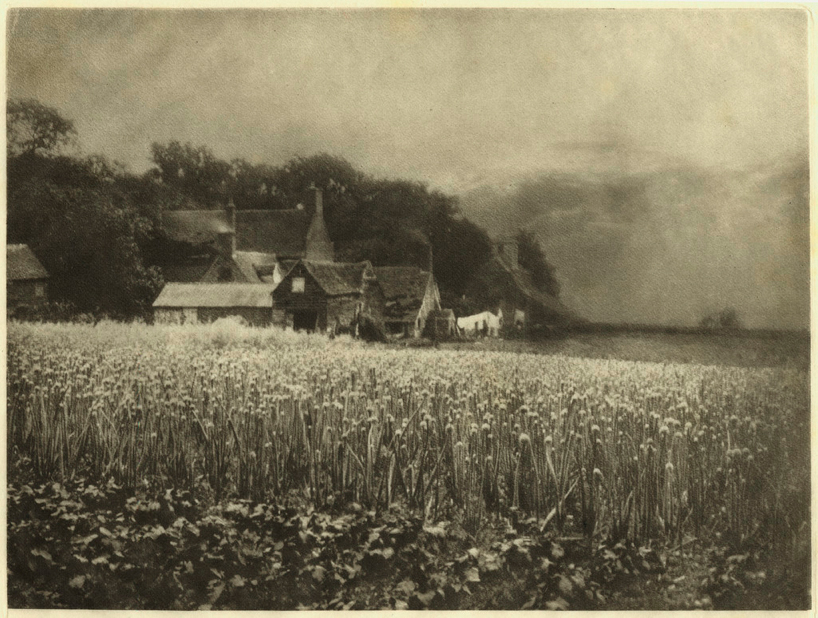 “The Onion Field” 1889, by George Davison
Pinhole photography has seen a marked resurgence in contemporary concept-based fine art photography, with a passionate following, yet one often devoid of a sound conceptual approach. Several websites deal with the subject and application of the pinhole methodology: http://www.pinholeresource.com/, http://chriskeeney.com/ck-pinhole-photography-resources, http://photo.net/learn/pinhole/pinhole.
Pinhole photography can be very affordable, with laser drilled brass pinholes of varying diameters available for 35mm DSLR’s and medium format digital cameras, yet these lack the hand of the artist insofar as creating your own pinholes can be far more unpredictable and therefore more appropriate for the “chance” element of the medium in terms of the methodology used to support a sound stylistic conceptual application. An example of this personal application can be seen in a collaborative project with Cathy Dutertre in her ongoing search for spiritual and scientific questionings, “Quest”, created with a pinhole mounted directly on a medium format digital array. http://www.pierredutertre.com/2013-collaborative-project/, http://cathylyn.com/new-work/.
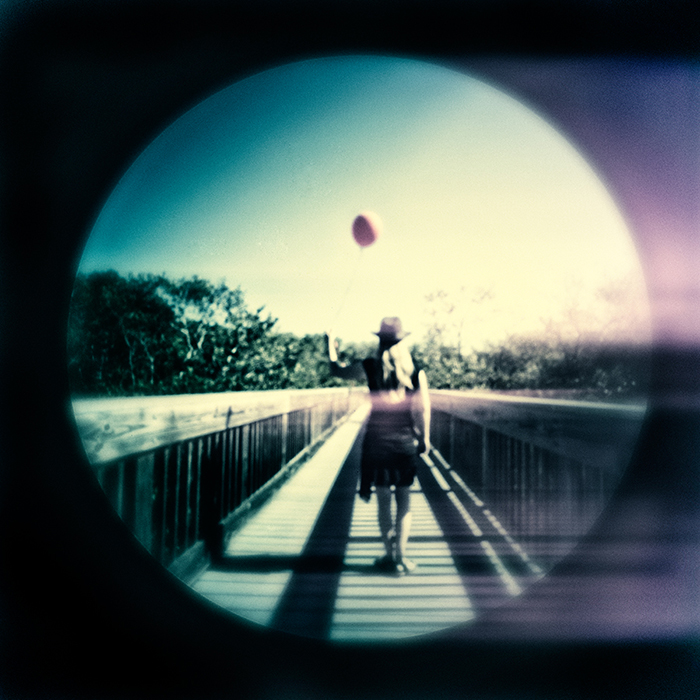 “Flight”, by Cathy Dutertre
  Ground #42, 1997 by Uta Barth
The method of defocusing a good optic for a conceptual approach resulting in experiential imagery can at first glance appear easy and gimmicky, yet I must simply say that it is a most difficult technique that requires a precise intent rather than the search for singular “cool” images. Hiroshi Sugimoto, as discussed earlier, has applied this methodology in a consistent manner to illustrate his personal approach to illustrating architectural icons in a minimalist style and intent. Uta Barth, a contemporary post-modernist conceptual artist has applied a different technique by focusing her camera on an object close to her camera and effectively defocusing a banal scene further away, often within the confines of her immediate spatial presence, thereby offering a reconstruction of mundane environments for experiential outcomes. I have applied similar conceptual principles within my ongoing “Seascapes” series, one firmly inspired by pictorialist principles as well as post-modernist approaches of deconstructing the inane representative qualities of the medium, using a flawed 40mm Hasselblad lens on a mechanical body mounted with a medium format digital array that is taped on the body with duct tape due to incompatibility. http://www.pierredutertre.com/sea-scapes/
 “Seascape Study #7”, by Pierre Dutertre
This leads me to consider the radical approach of using flawed optics, or vintage optics from collectible cameras, mounted on modern digital platforms with a variety of MacGyver methods, such as glue or duct tape. David Arnold, a fully engaged artist, educator and mentor first introduced me to the possibilities of using flawed optics for expressive purposes, often cannibalizing vintage camera lenses and mounting these on a variety of digital cameras with tape in order to introduce a “chance” element to the resulting imagery. This approach clearly follows the great philosopher Vilem Flusser http://monoskop.org/images/c/c4/Flusser_Vilem_Towards_a_Philosophy_of_Photography.pdf who wrote that the photographer must be in full control of his “apparatus”, the camera, in order to rewrite the parameters of the mechanical aspects of the technology in order to uplift its limitations that are created by the manufacturer and society as a whole, to reinterpret the artist’s viewpoint as a communicative outcome for the viewers who will then reconstruct their own interpretation according to their personal cultural background. http://davidarnoldphotography.com/
In conclusion, I must point out that the technique of blur cannot simply be the result of accidental experiments, nor can it be the ubiquitous search for “cool” images, but rather the intellectually and stylistically driven approach to creative expressionism, the mandated outcome of any artist who seeks to communicate a personal view of their personal interpretation of the world at large to their viewers.
If you are interested in knowing more about the complex technique of optical or lens-less blur, I will be conducting exclusive and practical workshops later this year under the guise of the UPA Gallery.

Recent Comments