
The Use of Natural Low-Light and Neutral Density Filters in Concept-Based Landscape Photography
I want to thank UPA Gallery – and Pierre Dutertre in particular – for inviting me to write this guest blog. I’m grateful for the opportunity to introduce my work to the readers of this unique educational blog and appreciate UPA’s commitment to giving exposure to emerging fine art photographers.
Stormy Weather
Monster hurricanes… saturating heat … biblical rains … what’s not to love about summer in Florida? At least when it comes to photography. When the skies turn dark and stormy and people seek shelter indoors, I grab my camera gear and go to work outside.
In this blog post I’ll review how I use low-light conditions – especially rainy low-light conditions – and ND filters in my concept-based landscape photography, specifically for lighting aesthetics and water-blur effects. We’ll take a detailed look at two images from my Florida series, called “Remnants,” to see examples of how I approach low-light conditions with and without ND filters.
First, it’s important to understand what an ND filter is. Basically, it’s a lens filter made of dark glass (like sunglasses) that reduces the amount of light reaching a camera’s sensor. This allows for much slower shutter speeds in order to create motion-blur effects, among other things. There are different kinds of ND filters – slot-in, screw-on and variable – each with different density ratings that give various f-stop reductions. There are pros and cons to using each type that’s beyond the scope of this blog post, but a quick Google search using the terms “ND Filter” will pull up many useful articles for further reading.
Natural Low-Light Effects
My Florida portfolio is called “Remnants” on www.scottbolendz.com . It documents small moments of modest natural beauty – what I call the “diminished sublime” – in remnant green spaces along Florida’s heavily developed Gulf Coast. The images have a delicate, compressed, dream-like quality due to the contingent, often fleeting, nature of the depicted scene. This project is influenced, in part, by Clyde Butcher’s Florida series and Michael Kenna’s long-exposure work.
I like shooting in rainy low-light conditions because the camera can transform a relatively mundane landscape into something otherworldly. Such low-light is often sufficient by itself for longer exposure times, which can be especially useful if groundwater is present (as is often the case in Florida). One of the challenges of shooting the lush Florida landscape is the visual complexity of the vegetation. Water reflections often add distracting elements to an image (at least to my eye). Longer exposure times, however, can soften or even obliterate water reflections and give a smooth, silky, almost dream-like surface plane that can add depth and simplify a composition. ND filters allow for even longer exposure times when necessary.
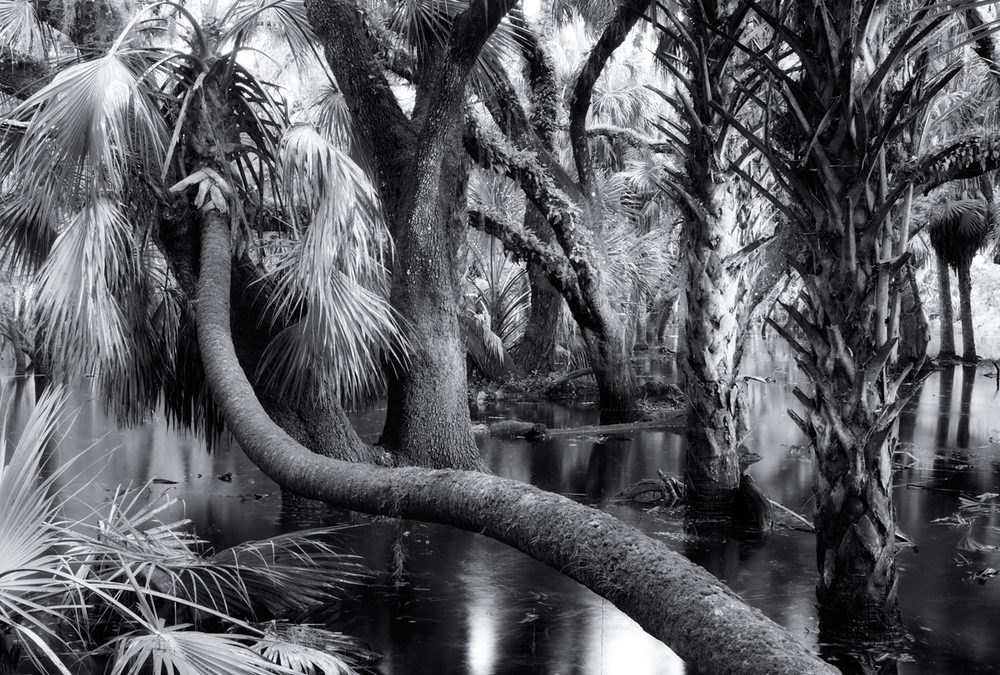
 “Myakka Park Drive 1, Sarasota” by Scott Bolendz
My photograph “Myakka Park Drive, Sarasota” was shot immediately after a thunderstorm. I set my Nikon D600 on a tripod (a definite must for long-exposure work!) and tried to get a long exposure time without using an ND filter. I was using a Nikkor 24 mm/2.8 prime lens. I set my camera/lens to manual focus (infinity), aperture priority f/16 and ISO 100 which gave me a shutter speed of 5 seconds. This was long enough because raindrops were still falling from the wet foliage onto the groundwater surface, creating small disturbances that would help in achieving a nice water-blur effect. This, in turn, would create a clean background plane to highlight the layers of lush, complex foliage. And – voila!
ND-Filtered Lighting Effects
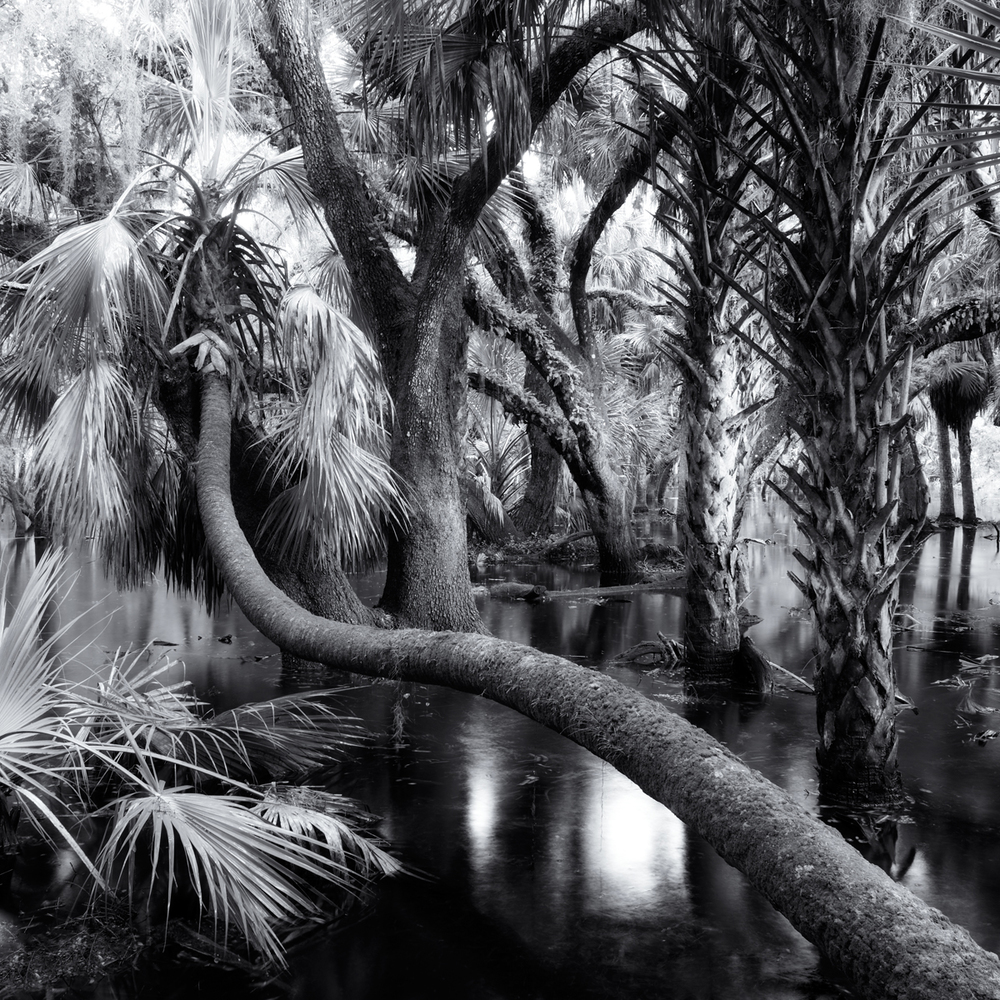
 “Remnant Mangrove, Tampa Bay” By Scott Bolendz
My photograph, “Remnant Mangrove, Tampa Bay”, was shot at mid-day using a 64x ND filter during a brief interlude between coastal storms at Emerson Point in Bradenton, Florida. The clouds and water were both moving slowly, but the light was too bright for longer exposures without the benefit of an ND filter. Even at f/22 and ISO 100 the shutter speed was 1/20 second (too fast for motion-blur).
I only carry 2 high-quality screw-on ND filters: a 64x (6-stop reduction) and a 1000x (10-stop reduction). These 2 filters offer a decent range of f-stop reductions for most lighting situations I encounter.
The workflow for this image is more involved because it’s necessary to compose and meter the scene prior to attaching the ND filter (the viewfinder is too dark when the ND filter is attached):
1. Set the camera on a tripod.
2. Use manual focus (set to infinity) and frame the scene – I used my 24 mm prime lens.
3. I metered the scene using aperture priority f/22 and ISO 100 for the longest exposure possible prior to adding an ND filter.
4. Next, check the shutter speed. It was 1/20 for this particular camera setting.
5. Enter the 1/20 shutter speed value into a long exposure calculator (free apps are available on iTunes!) to see what new shutter speed would be required for a similar exposure if a 64x or 1000x ND filter were attached. The results: 3 seconds (64x) and 51 seconds (1000x). Based on current conditions, I chose the 64x.
6. Next, put the camera setting on full manual and replicate all the previous settings from aperture priority (f/22, ISO 100, etc…) and select a new shutter speed of 3 seconds (to account for the 64x ND filter).
7. Carefully attach the 64 x ND filter to the prime lens.
8. Use a wireless shutter release or the camera’s timer to take the picture.
I often have to increase or decrease the calculated shutter speed based on what the first captured image actually looks like on the camera’s LCD screen. The image may be under or over-exposed (I only shoot RAW files so I can tweak the exposure in post-production). If you decide to re-compose the image, remove the ND filter and start the process all over again.
Here are a few more examples of my Florida series shot in rainy low-light conditions with ND filters. Again, notice how the blurred water surface provides a clean plane that nicely highlights a visually complicated subject.
 “Remnant Mangrove, Terra Ceia Bay” By Scott Bolendz
 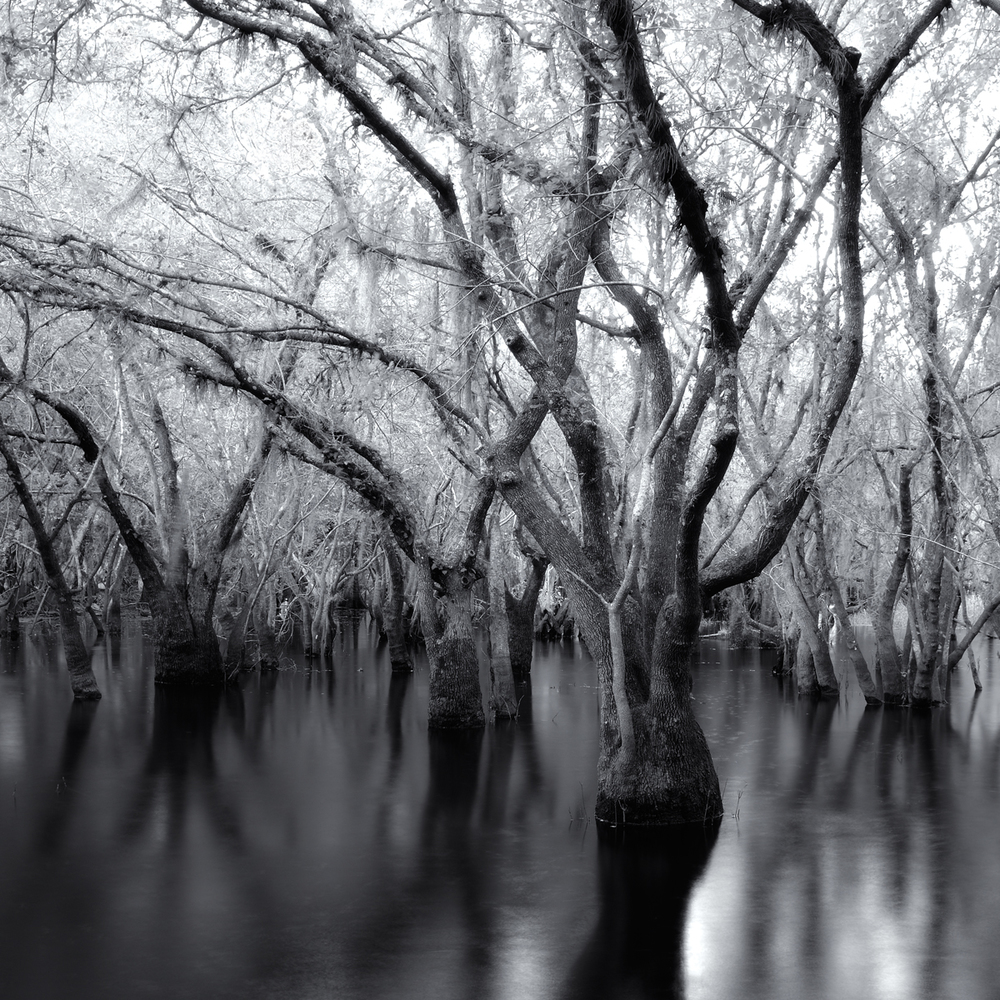 “Myakka Park Drive 2, Sarasota” By Scott Bolendz
Some final thoughts
First, since I mainly shoot with a prime lens for my Florida series, the workflow process described in this blog post applies to prime lenses. Use of an ND-filter on a zoom lens is a somewhat different – and more difficult – workflow which I will review in a future UPA Blog post. Second, when shooting long exposures for either water or cloud-blurring effects, it’s important to be aware of even slight movements of your subject. This is less of an issue if the subject is a mountain or city buildings. But with vegetation and wind movement – like coastal mangroves, for example – you may need to be very patient until the subject is absolutely still. And if you’re shooting in rainy low-light conditions, patience is a virtue!
Contributed By: Scott Bolendz
Scott Bolendz is an emerging fine art photographer. His landscape work has won several awards at The Florida Museum of Photographic Arts in Tampa. To see more of his images you can visit his website www.scottbolendz.com or follow him on Facebook at “Scott Bolendz Photography.”
Recent Comments